Chapter 6
The House on Your Back
Choosing and fitting a pack
Here begins Part II, where the day bag grows into a home you carry. The backpack is the piece of gear that most decides whether backpacking feels like freedom or like penance, and the difference is almost never the pack’s price. It’s the fit. A cheap pack fitted correctly outcarries an expensive one fitted wrong, every mile of every day. This chapter is mostly about your hips.
The One Thing That Makes a Pack Bearable
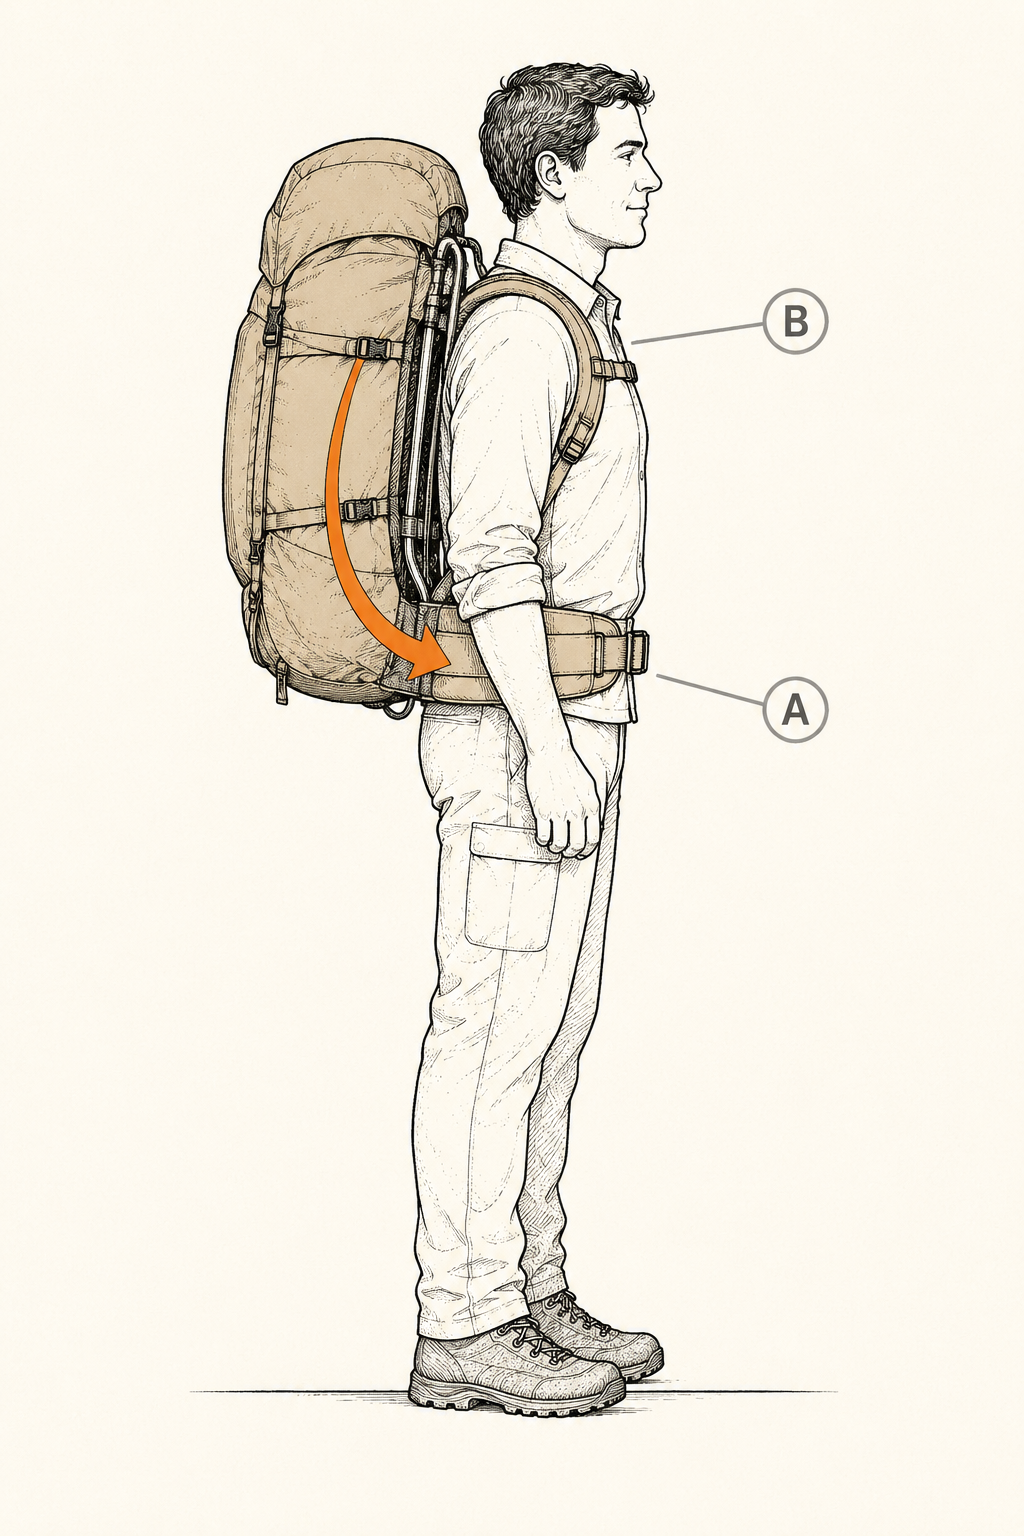
A loaded backpack is carried on your hips, not your shoulders, roughly 80 percent of the weight should ride on your hip bones, with the shoulders merely steadying the load. A pack that hangs from your shoulders will punish you within two miles; a pack that sits on your hips can be worn comfortably all day.
This is the whole secret, and it’s worth sitting with because it’s counterintuitive. Your shoulders feel like the natural place to hang a pack, that’s how school backpacks work. But your shoulders are a terrible structural choice; they fatigue fast and route strain into your neck and back. Your hips are built for load-bearing (they carry your entire upper body already), and a proper backpack’s hip belt transfers weight directly onto them through a rigid or semi-rigid frame. The sensation the first time you feel a heavy pack settle onto your hips instead of dragging at your shoulders is a small revelation. It’s the moment backpacking stops seeming masochistic.
The mechanism is the frame. Every real backpacking pack has one, a structure that catches the weight up high and channels it down to the hip belt. Without it, a load just sags off the straps. With it, forty pounds becomes something your skeleton’s strongest region handles with room to spare.
How to Choose a Backpacking Pack: Start With Size
Choose pack capacity by trip length, measured in liters: roughly 30–50 liters for overnights and weekends, 50–65 liters for multi-day trips, and 65+ liters for week-long hauls or bulky winter gear.
Liters measure the pack’s total volume, and the modern trend runs smaller than it used to, better, lighter gear packs down further, so a 50-liter pack today swallows what needed 70 liters a generation ago. For your first overnights, a 40- to 50-liter pack is the sweet spot: big enough for a beginner’s not-yet-minimized kit, small enough that it can’t tempt you into hauling your whole apartment. Buying huge “to grow into” is a classic trap, a big empty pack just gets filled with things you don’t need and weight you’ll curse.
A note on the old measurement: you may see vintage packs and forum posts rating capacity in cubic inches (a 50-liter pack is about 3,000 cubic inches). Liters have won; if you meet cubic inches in the wild, divide by roughly 61 to translate.
Internal Frame vs External Frame
Nearly all modern packs are internal-frame, the supporting stays are built inside the pack body, holding the load close to your back for balance. External-frame packs (a rigid frame on the outside, bag hung on it) are now a legacy design, still loved by a few for heavy loads on maintained trails, but not what you’ll be shopping for.
The internal frame won because it moves with you. Held close to your body, the load stays over your center of gravity, so it doesn’t sway or throw you off balance when you scramble, cross a stream, or pick down a rocky descent. That control matters everywhere trails get interesting. The external frame’s advantages, it rides cooler off your back, and it’s a little easier to pack through its open top, are real but narrow, and they belong to a kind of trail (wide, smooth, heavily loaded) that beginners rarely start on.
You’ll still encounter external frames: inherited from a relative, found cheap at a garage sale, praised by an old-timer. There’s nothing wrong with learning on one you already have. But when you buy, buy internal. It’s what fits the terrain, what the shops stock, and what the rest of this book’s advice assumes.
Fitting a Pack: Torso Length First
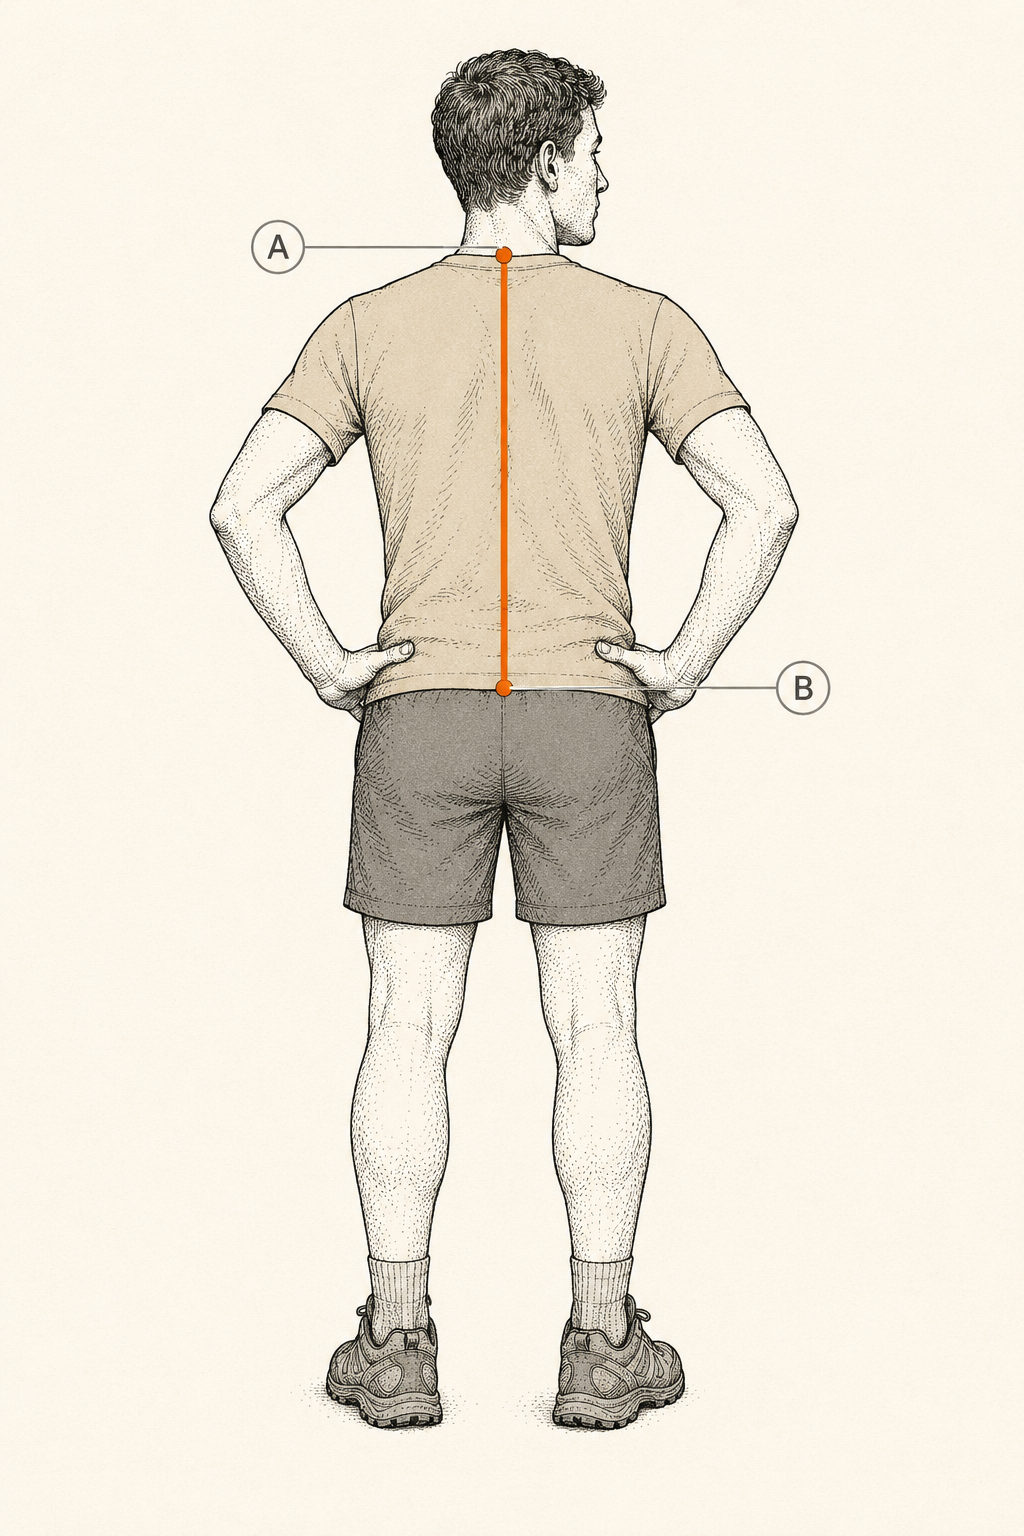
A pack fits your torso, not your height, and torso length is measured from the bony bump at the base of your neck (the C7 vertebra) down to the top of your hip bones (the iliac crest). Match the pack’s size to that measurement before anything else.
Two people of the same height can have very different torso lengths, which is why “it’s a large because I’m tall” is how packs end up hurting. Have a friend measure yours: find the C7 bump (it sticks out when you tip your head forward), find the top of your hip bones with your hands on your waist, and measure the spine between them. That number in inches or centimeters maps to pack sizes, small, medium, large, or an adjustable back panel that spans a range. Many packs adjust; some come in fixed sizes; women’s and youth-specific models exist because torso proportions and hip shapes genuinely differ. Buy for your body, not the model name.
Get this measurement right and everything downstream gets easier. Get it wrong and no amount of strap-fiddling saves the fit, the hip belt lands above or below your hips, the shoulder straps pull wrong, and the load never settles.
Fitting a Pack: The Adjustment Sequence
Fit a loaded pack from the hips up, in order: hip belt, shoulder straps, load lifters, sternum strap. Doing it in that sequence is what puts the weight where it belongs.
Always fit with weight in the pack, 15 to 20 pounds (7–9 kg) minimum, because an empty pack lies about its fit. Then:
- Hip belt. Settle the belt so its padding wraps the top of your hip bones, the belt’s center should sit on the crest, not above or below. Tighten. The load should visibly transfer onto your hips.
- Shoulder straps. Snug them until they contour your shoulders, but they should not be carrying the load, you’re removing slack, not hanging weight. You should be able to slip a finger under the strap. If the straps dig, the hip belt isn’t taking enough; loosen the shoulders and re-set the hips.
- Load lifters. These small straps run from the top of the shoulder straps up to the pack body. Tighten gently until they angle up at roughly 45 degrees, pulling the top of the load toward you. Don’t crank them, they fine-tune, they don’t carry.
- Sternum strap. Clip it across your chest and snug it just enough to keep the shoulder straps from sliding outward. Not tight enough to restrict breathing.
Walk around. Load up stairs if the shop has them. Then reach back and re-check the hip belt, it loosens as the pack settles, and re-snugging it is the most common fix for a pack that “started hurting after a mile.”
Safety A pack that forces your shoulders to carry the load doesn’t just hurt, it fatigues you faster and shifts your balance high, which matters on exposed or slippery ground. Comfortable carrying is safer carrying. If you can’t get the weight onto your hips, the pack is the wrong size or wrongly loaded; fix it before the trailhead.
How Heavy Should Your Loaded Pack Be?
Aim to keep your fully loaded pack at or under about 20 percent of your body weight for comfortable backpacking, under 25 percent as an outer limit. For a 150-pound (68 kg) person, that’s a target around 30 pounds (14 kg), ceiling around 37 (17 kg).
This is a target to design toward, not a rule you’ll nail on trip one. Beginners routinely start heavier because they haven’t yet learned what they can leave home; that’s normal, and the number drops fast with experience. But treat 20 percent as the goal that shapes every other decision, it’s why Chapter 15 obsesses over what goes in the pack, and why the “big three” (pack, shelter, sleep system) get so much attention: they’re where the weight actually lives.
The old carrying-capacity folklore, a third of your body weight for a man, a quarter for a woman, describes what a body can haul, not what makes for a good trip. Carrying near your maximum turns hiking into labor and multiplies every risk from blisters to falls. The modern ethic is lighter and happier: carry what you need, need less over time.
Women’s, Youth, and Body-Specific Fit
Pack fit is genuinely bodyshape-dependent, and manufacturers now build for that: women’s-specific packs (narrower shoulder straps, differently curved hip belts, shorter torso ranges), youth packs, and plus-size hip belts all exist because one shape doesn’t fit all torsos and hips.
Don’t read “women’s” or “men’s” as a rule, read them as fit profiles. The best pack for you is the one whose torso range and hip-belt shape match your body, whatever label it wears. Many people fit the “other” category’s pack better, and good shops know this and fit to the person. The features that matter are objective: does the hip belt wrap your actual hips comfortably, does the torso length match, do the shoulder straps clear your neck and (for some) chest without pinching? A pack that answers yes is your pack.
A Few Features Worth Understanding
Beyond fit and size, a handful of pack features earn their keep: a few external pockets for access, a hip-belt pocket for snacks and phone, side compression straps to stabilize a light load, and a rain cover or pack liner because packs are not waterproof.
Everything else is negotiable and mostly personal. Top-loading versus front-loading (panel access) is preference. A “brain” (top lid pocket) is handy but not essential. Attachment points for trekking poles and an ice axe matter only if you carry those. Hydration-bladder sleeves are common and nice. What you should not pay for is a wall of features you’ll never use, every buckle and pocket adds weight and cost, and the simplest pack that fits and holds your kit is usually the right one. Waterproofing deserves one real note: assume your pack is not waterproof (almost none are), and protect the contents with a pack liner (a heavy trash bag works) or a rain cover. Wet sleeping bags are a Chapter 22 problem you prevent here.
Trail Notes
- The load rides on your hips (~80%); the shoulders only steady it (~20%). This is the whole game.
- Size by trip: ~40–50 L for beginner overnights and weekends; go smaller-not-bigger.
- Buy internal-frame. External frames are a legacy design you may learn on but won’t shop for.
- Fit torso length first (C7 to hip crest), then adjust loaded, hips-first: belt, shoulders, load lifters, sternum.
- Target a loaded pack ≤ ~20% of body weight, ~25% ceiling. Design every other choice toward that.
- Packs aren’t waterproof, line the inside or cover the outside.
Rookie Mistakes
- Fitting an empty pack. Empty packs fit everyone and support no one. Load 15–20 lb (7–9 kg) before judging.
- Buying oversized to grow into. A big empty pack is a weight magnet. Size to the trip you’re actually taking.
- Chasing the hurt with the shoulder straps. Digging straps mean the hip belt is slacking. Loosen shoulders, re-set hips.
- Sizing by height. Torso length runs the fit; tall people have short torsos and vice versa.
- Trusting the pack to be waterproof. It isn’t. Line it, or meet your soaked sleeping bag at camp.
FAQ
What is the 20% rule for backpacking? It’s the guideline that your fully loaded pack should weigh no more than about 20 percent of your body weight for comfortable travel (25 percent as an upper limit). For a 150-pound (68 kg) hiker, that’s roughly a 30-pound (14 kg) target. Beginners often exceed it at first; the number falls with experience.
How do I know what size backpack I need? Size on two axes. Capacity comes from trip length, about 40–50 liters for beginner overnights and weekends. Fit comes from your torso length (neck to hip crest), which maps to the pack’s frame size (small/medium/large or adjustable). Match both; height alone tells you neither.
Is an internal or external frame backpack better? Internal frame, for almost everyone today. It holds the load close for balance on uneven terrain and is what shops stock and this book assumes. External frames are a legacy design with niche strengths (cooler carry, heavy loads on smooth trails); fine to learn on if you have one, not what to buy new.
Why do my backpack’s shoulder straps hurt? Because they’re carrying weight the hip belt should. Re-fit hips-first: settle the belt on your hip bones, tighten it, then take slack out of the shoulder straps without hanging the load on them. Re-snug the hip belt after it settles, that single adjustment fixes most “it started hurting” complaints.
Do I need a women’s-specific backpack? Only if it fits you better, and for many women it does, because of narrower strap spacing, curved hip belts, and shorter torso ranges. Treat “women’s” and “men’s” as fit profiles, not rules. The right pack is whichever one’s torso length and hip-belt shape match your body.
Read offline
The whole book as one PDF — every chapter, every diagram.