Chapter 16
Which Way Is North
Maps, compass, and apps
Navigation is the skill that lets you leave the well-signed trails behind, and, more urgently, the skill that gets you home when something goes wrong. The modern hiker navigates with a phone, and that’s genuinely excellent right up until the battery dies or the phone shatters on a rock. This chapter builds a layered system: a phone for ease, paper and compass for backup, and the judgment to use both. You don’t have to become an expert. You have to never be helpless.
The Navigation System: Redundant by Design
Carry and know how to use two independent navigation methods: a phone with offline maps as your primary tool, and a paper map plus compass as backup. Electronics fail, batteries die, screens break, cold kills power, so the paper backup is what makes the system trustworthy.
This redundancy is the heart of modern navigation. Your phone is a phenomenal navigation device, GPS shows your exact location on a detailed map, even offline, and it will be your everyday tool. But a navigation system that depends on one fragile, battery-powered device is not a system; it’s a gamble. So the rule is: phone as primary, paper map and compass as backup, and the skill to use each. The paper doesn’t run out of battery, doesn’t break when dropped, and works in the cold. Most trips you’ll navigate entirely by phone and never touch the map. The map is there for the trip where the phone fails, and that’s exactly the trip where navigation matters most.
How to Read a Topographic Map
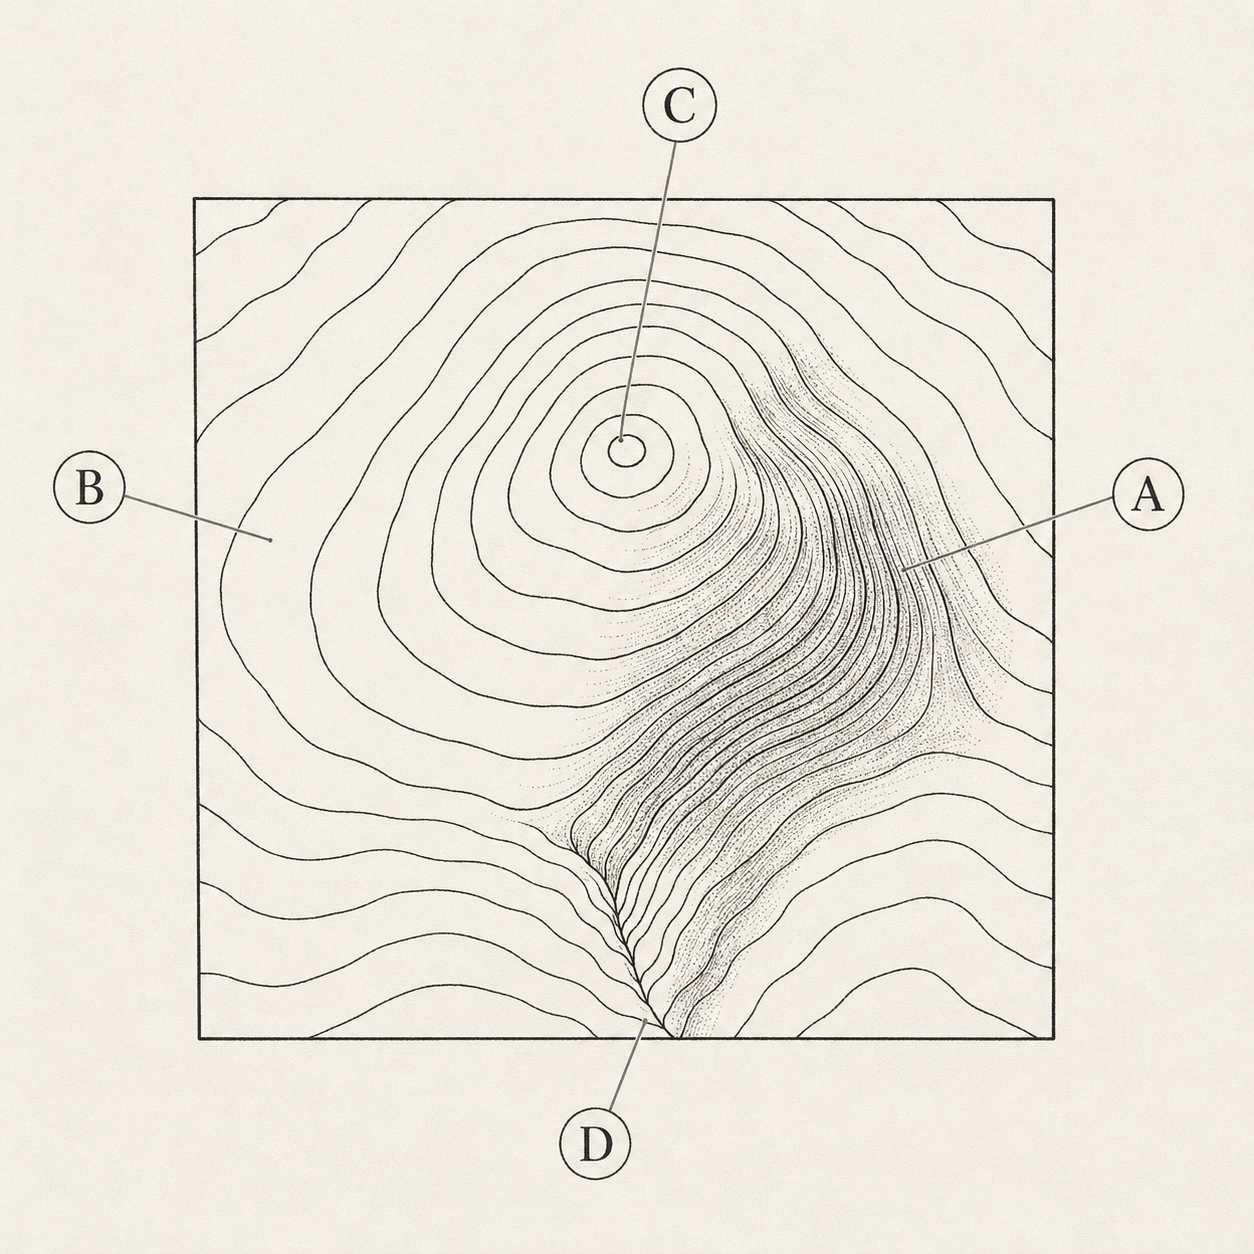
A topographic (“topo”) map shows the shape of the land through contour lines, lines connecting points of equal elevation. Lines close together mean steep terrain; lines far apart mean gentle ground. Reading them lets you see the hills, valleys, and grades before you walk them.
Contour lines are the topo map’s superpower, and they’re simpler than they look. Each line traces a constant elevation, and the vertical distance between lines (the contour interval, stated in the map’s legend) is fixed, so bunched-up lines mean a steep slope (lots of elevation change over little horizontal distance) and widely spaced lines mean gentle terrain. With practice you read the landscape directly: concentric circles are a peak, a V pointing uphill is a drainage or stream, a V pointing downhill is a ridge. The map’s legend decodes everything else, the contour interval, the scale (how map distance relates to ground distance), which way is north, and the symbols and colors for trails, water, and vegetation. Learn to read a topo map and you can look at it and see the terrain: where the climbing is, where the water runs, where a viewpoint hides. It’s a genuinely satisfying skill, and it makes every map a preview of the trip.
How to Use a Compass
A basic compass shows you which way is north via its magnetized needle, letting you orient your map to the real world and follow a direction of travel. For most trail hiking, the core skills are orienting the map and taking or following a simple bearing.
You don’t need advanced compass work for trail hiking, but the fundamentals are worth owning. Start with the most useful, simplest skill, orienting the map:
- Lay the map flat and set the compass on it.
- Rotate the map (with the compass on it) until the map’s north lines align with the compass needle’s north.
- Now the map matches the world, features on the map point toward the real features around you. This alone, map oriented to reality, solves most “which way do I go?” moments, letting you match the terrain you see to the map and confirm your direction.
The next skill is following a bearing (a direction in degrees): set the bearing on the compass housing, then turn your body until the needle sits in its outline, and the direction-of-travel arrow points where you walk. You’ll rarely need this on marked trails, but it’s invaluable in fog, above treeline, or when a trail vanishes, you can hold a straight line toward a known landmark or back toward a trail. A short practice session in a park teaches the basics faster than any amount of reading.
Understanding Declination
Declination is the difference between true north (the geographic pole) and magnetic north (where your compass needle points), and it varies by location. For accurate compass work you must account for it, either by adjusting your compass or by doing the map’s stated correction.
This is the one compass concept that trips people up, so here’s the plain version. Your compass needle points to magnetic north, but maps are drawn to true north, and depending on where you are on Earth, those can differ by many degrees, enough to walk you well off course over a distance. The amount and direction (east or west) is the declination, and it’s printed on good topo maps (and shown by apps and online tools for your location, though it drifts slowly over years). To handle it: many compasses let you set the declination once (a small adjustment, often with a tiny screw), after which the compass reads in true north and you can ignore the correction. Otherwise you add or subtract the declination manually per the map’s instructions. For casual trail navigation with an oriented map you can often get by, but for any real bearing work, get declination right, an uncorrected bearing is a confidently wrong one.
Navigating With Your Phone
A smartphone with a GPS hiking app and downloaded offline maps is a powerful, easy primary navigation tool, it shows your exact location on a topo map without any cell signal. The essential habit is downloading your maps before you leave, while you still have signal or Wi-Fi.
Modern hiking apps have transformed navigation: your phone’s GPS pinpoints your location on a detailed topographic or trail map, shows the route, tracks your progress, and works entirely offline once the maps are downloaded. This is why the phone is most hikers’ primary tool, it’s accurate, easy, and removes almost all “where am I?” anxiety. The critical, non-obvious step is downloading the maps for your area before the trip, because you usually won’t have cell signal in the backcountry, and an app without downloaded maps is a blank screen. Do this at home on Wi-Fi. Then, to make the battery last (Chapter 12): keep the phone in airplane mode (GPS still works without cell signal), turn the screen off between checks, and carry a power bank. Popular apps offer downloadable topo maps, trail databases with recent conditions, and route planning, a subscription to a good one is a small price for the capability. Just never let the phone be your only navigation, for the reasons this chapter keeps repeating.
Satellite Messengers and Emergency Communication
For trips beyond cell coverage, a satellite messenger or personal locator beacon (PLB) lets you call for help from anywhere, a genuine safety upgrade for remote or solo backpacking. Newer phones with satellite SOS features offer a partial version of this capability.
Deep in the backcountry, a normal phone can’t call for help, there’s no signal. Dedicated satellite devices solve this by connecting to satellites instead of cell towers. A satellite messenger (subscription-based) lets you send text messages and an SOS from anywhere with a view of the sky, and many let family follow your progress or let you two-way message rescuers, the extra reassurance is why they’re popular for remote and solo trips. A personal locator beacon (PLB) is a simpler, subscription-free device that does one thing: broadcast an emergency SOS with your location to rescue authorities. And increasingly, newer smartphones include satellite SOS features that can send emergency messages without cell coverage, a real safety benefit, though currently more limited than a dedicated device. None of these replace good judgment and a trip plan (Chapter 14), but for remote travel, the ability to summon help from anywhere is a profound safety improvement. Consider one as your trips get more ambitious.
Safety A satellite SOS device is for genuine emergencies, serious injury, being truly lost or stranded, life-threatening situations, not for convenience. False alarms put rescuers at risk and strain the system. Carry it, know how to trigger it, and reserve it for real emergencies.
What to Do If You Get Lost
If you realize you’re lost, stop. Don’t keep walking and make it worse. Stay calm, think, and use the STOP method, Stop, Think, Observe, Plan, to reorient before you move.
Getting turned around happens to everyone eventually, and the instinct to push on “until it looks familiar” is exactly wrong, it usually makes things worse and harder to reverse. Instead, STOP:
- Stop. The moment you think you’re lost, halt. Don’t take another step deeper into uncertainty.
- Think. When were you last certain of your location? How long ago, and in what direction? Don’t panic, panic is the real danger, and staying calm is a survival skill.
- Observe. Check your map, compass, and phone. Look at the terrain around you and match it to the map. Can you see a landmark you can find on the map?
- Plan. Based on what you know, make a plan, often, carefully retracing your steps to your last known point is safest. If you truly can’t reorient and it’s getting dark or dangerous, it’s often best to stay put (especially if you left a trip plan, searchers are coming to your route), stay warm and visible, and signal for help (whistle: three blasts; your satellite SOS if you have one).
This is the moment your whole layered system pays off: the phone location, the paper map backup, the trip plan you left, the whistle, the extra layers and food from the Ten Essentials. Prepared hikers who get briefly lost have a bad hour; unprepared ones who panic and push on have an emergency. Stop, think, and use what you carried.
Trail Notes
- Navigate with redundancy: phone + offline maps as primary, paper map + compass as backup, and the skill for each. Electronics fail exactly when navigation matters most.
- Read topo contour lines: bunched = steep, spread = gentle, rings = peak, V uphill = drainage. The legend decodes scale, interval, and symbols.
- Core compass skills: orient the map to reality (solves most problems), and follow a bearing (for fog, whiteout, lost trail).
- Account for declination, the true-vs-magnetic-north difference. Set it on the compass or correct per the map.
- Phone navigation is excellent, download maps before you leave, run airplane mode, carry a power bank. Never phone-only.
- If lost: STOP, Stop, Think, Observe, Plan. Don’t push on. Often retrace or stay put, stay warm, signal for help.
Rookie Mistakes
- Phone as the only navigation. One dead battery or cracked screen and you’re helpless. Carry paper and know how to use it.
- Forgetting to download offline maps. An app with no downloaded map is a blank screen in the backcountry. Download at home on Wi-Fi.
- Ignoring declination on real bearings. Magnetic and true north differ enough to walk you off course. Set it or correct it.
- Walking on when lost. Pushing “until it looks familiar” makes it worse. Stop the instant you’re unsure.
- Panicking. Panic is the actual danger. Stop, breathe, and work the STOP method with the tools you carried.
FAQ
How do you use a compass for beginners? The most useful skill is orienting your map: lay it flat, set the compass on it, and rotate the map until its north lines match the compass needle, now map features point toward the real terrain. The next skill is following a bearing: set a direction on the housing, turn until the needle sits in its outline, and walk where the arrow points. Practice both in a park first.
How do you read a topographic map? Read the contour lines: each connects points of equal elevation, so lines close together mean steep terrain and lines far apart mean gentle ground. Concentric rings mark a peak; a V pointing uphill marks a stream drainage. The legend gives the scale, contour interval, north direction, and symbols. Together they let you “see” the land’s shape before you hike it.
What is declination on a compass? Declination is the difference between true north (the geographic pole, which maps use) and magnetic north (where your compass needle points), and it varies by location, sometimes by many degrees. For accurate compass work you must account for it, either by setting the declination on an adjustable compass or by correcting manually per your map’s stated value. Ignoring it walks you off course.
What’s the best hiking navigation app? The best app is one with downloadable offline topographic maps, a solid trail database with recent user reports, and reliable GPS tracking, several popular options do all three. More important than which app is the habit: download your maps before you leave (you won’t have signal on the trail), run your phone in airplane mode to save battery, and always carry a paper map and compass as backup.
What should you do if you get lost hiking? Stop immediately, don’t keep walking. Use the STOP method: Stop, Think (when were you last sure of your location?), Observe (check map, compass, phone, and surroundings), and Plan (usually retrace to your last known point, or if you can’t reorient, stay put, stay warm and visible, and signal for help). Staying calm and staying put, especially if you left a trip plan, is often safest.
Read offline
The whole book as one PDF — every chapter, every diagram.