Chapter 18
Home for the Night
Choosing and making camp
You’ve hiked in with everything you need on your back; now you build a home for the night and, in the morning, erase it. Making and breaking camp is a set of simple routines that, once learned, become deeply satisfying, the daily rhythm of backcountry life. This chapter covers where to camp, how to set up efficiently, and how to leave a site so clean the next person never knows you were there.
How to Choose a Campsite
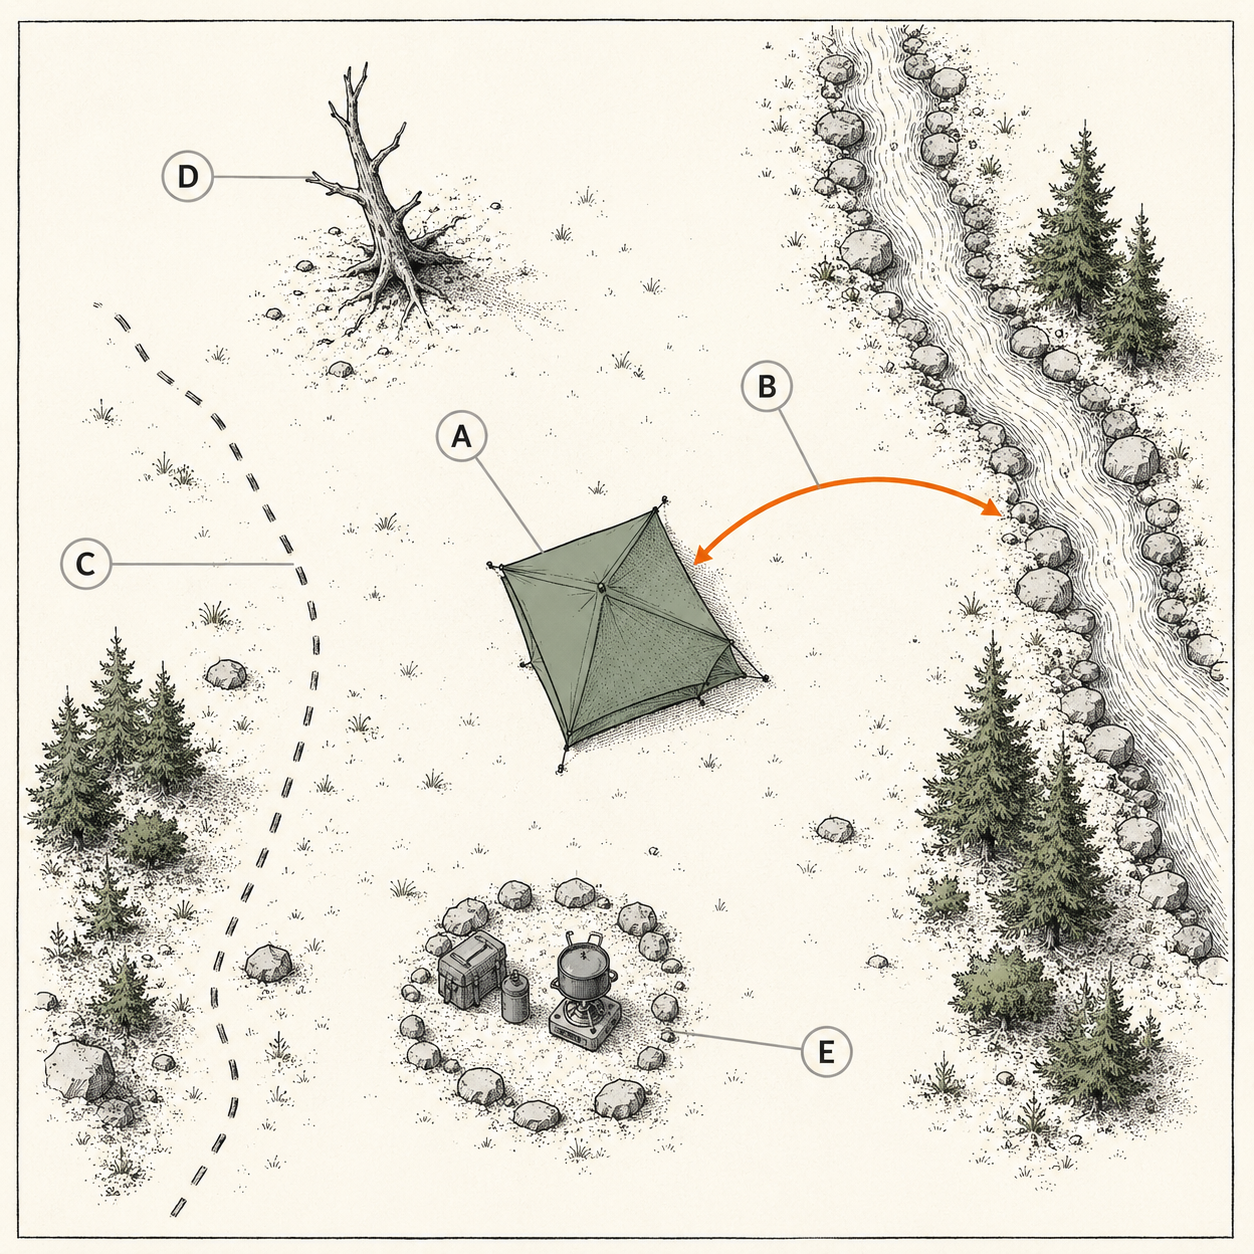
Choose a campsite on a durable, flat surface at least 200 feet (about 70 steps) from water and trails, sheltered from wind, and free of overhead hazards like dead branches. Wherever possible, use an existing established site rather than creating a new one.
A good campsite is safe, comfortable, and low-impact, and you’re screening for several things at once:
- Durable, flat ground. A level spot for your tent (a slight slope is workable, sleep with your head uphill). Camp on durable surfaces, established sites, rock, gravel, dry grass, not fragile vegetation that your tent will kill.
- 200 feet from water and trails. Camp at least 200 feet (about 70 adult steps) from lakes, streams, and the trail. This protects water quality, gives wildlife access to water, and preserves solitude for others, a core Leave No Trace rule (Chapter 21).
- Wind shelter. A spot with some natural windbreak (trees, terrain) is warmer and quieter than an exposed ridge or open meadow. But don’t tuck into the very lowest spot, which collects cold air and water.
- No overhead hazards. Look up. Dead branches, leaning trees, or dead standing trees (“widow-makers”) can fall in wind and kill. Never camp under them.
- Good drainage. Avoid low spots and depressions where rain will pool. You don’t need to dig trenches (an outdated, damaging practice), just pick ground that naturally sheds water.
The overriding principle: use existing campsites. In popular areas, established sites concentrate impact where it’s already occurred; pitching on a pristine spot spreads damage. Find the durable, already-used site and use it.
Setting Up Camp: The Order
Set up camp in a logical order while you have daylight: choose and clear the tent spot, pitch the tent, sort out your sleeping gear, then set up the kitchen area separately. Doing sleep-shelter first means you’re protected if weather or dark arrives faster than expected.
An efficient camp routine, done with light to spare (Chapter 14’s early-arrival advice pays off here):
- Choose and prep the tent spot. Using the criteria above, pick your spot and clear it of sticks and stones (they puncture floors and ruin sleep).
- Pitch the tent. Set it up (Chapter 9), stake and guy it out taut, orient the door away from the wind. Now you have shelter no matter what the weather does.
- Set up sleeping gear. Inflate or unroll your pad, unstuff your sleeping bag so it can loft (it needs time to fluff up before bed), and stage your headlamp where you’ll find it.
- Set up the kitchen, separate from the tent. Establish your cooking area a good distance from your tent (an important bear-country practice, Chapter 23), on a stable surface. Get water, treat it, and organize your cooking gear.
- Handle water and food storage. Filter enough water for cooking and morning, and plan your food storage (canister or hang) for the night (Chapter 23).
Doing shelter first is the safety logic: if a storm rolls in or dark falls faster than you planned, you’re already protected and the rest can happen from inside or in the rain. Set up while you can still see, and camp becomes calm instead of frantic.
Pitching the Tent Well
Orient and pitch your tent thoughtfully: door away from the prevailing wind, a taut pitch that sheds rain and resists wind, and the ground cleared and (if used) a footprint down. A well-pitched tent is warmer, quieter, and drier than a sloppy one.
The Chapter 9 pitching skills matter most when weather threatens. Orient the tent’s low, narrow end or its sturdiest side into the wind, and the door away from it, so wind doesn’t funnel in or stress the weakest panels. Get the pitch taut, a drum-tight fly sheds rain, resists wind, and stops the maddening flap that keeps you awake; loose pitches sag, collect water, and let the fly touch the inner tent (which causes leaks). Stake every corner and use the guy-lines when weather’s coming. Sleep with your head uphill on any slope. And clear the tent floor area completely, one forgotten pinecone feels like a boulder at 2 a.m. These small refinements are the difference between a tent that shrugs off a storm and one that becomes a wet, flapping ordeal.
The Kitchen and Camp Layout
Set up your kitchen and eating area separate from your sleeping area, ideally a good distance away and downwind, and keep it organized so cooking is efficient and cleanup easy. In bear country, this separation is a critical safety practice.
Think of camp as zones. Your sleep zone (tent) stays clean and free of food and food smells. Your kitchen zone, where you cook, eat, and store food, sits well away from the tent (a good distance, more in bear country). This separation means that if food odors attract an animal, it comes to your kitchen, not your tent. Set the kitchen on a stable surface, organize your cook gear and food so you’re not hunting for things mid-cook (Chapter 10), and cook in the open air (never in the tent, carbon monoxide and fire). Keep the area tidy as you go: it makes cooking pleasant and cleanup fast, and a clean kitchen doesn’t accumulate the crumbs and scraps that draw animals. After eating, clean up thoroughly and store all food and scented items properly (Chapter 23), a habit that protects both you and the wildlife.
Camp Comfort and the Evening
Make camp comfortable and enjoyable: change into dry camp clothes, keep warm, stay hydrated and fed, and settle in for the evening. Camp is the reward for the day’s hiking, set yourself up to enjoy it.
Once the work is done, camp life is the payoff. Change into dry clothes, swap sweaty hiking clothes for your dry camp/sleep layers, which is both more comfortable and warmer (damp clothes chill you). Stay warm as the temperature drops: layer up before you get cold, and a warm drink and hot meal help. Keep hydrating and eating, you need to replace the day’s fluids and calories. As evening comes, organize for the night and morning: stage your headlamp, tomorrow’s clothes, and anything you’ll want, and store your food. Then enjoy it, the quiet, the stars, the particular contentment of a camp you built with your own back. Try not to crawl into the tent too early (long nights lead to lying awake); a bit of conversation, stargazing, or simply sitting extends the evening pleasantly. This is what you came for.
Breaking Camp: Leave No Trace
Break camp systematically and leave the site cleaner than you found it: pack up your gear, thoroughly police the area for every scrap of trash and food, naturalize the site, and carry out everything you brought in. The goal is that no one can tell you camped there.
Breaking camp is setup in reverse, with an added obligation:
- Pack up gear. Stuff the sleeping bag, deflate and roll the pad, take down and pack the tent, break down the kitchen, everything back into its stuff sacks and the pack (Chapter 15).
- Police the site. Walk the entire area and pick up every scrap, micro-trash (bits of food, wrapper corners, twist ties), not just obvious garbage. Look where you cooked and ate especially. Pack out all of it.
- Naturalize. Scatter any gathered materials, brush out obvious tent-floor flattening if practical, and restore the site to look undisturbed. If you moved rocks or logs, put them back.
- Do a final sweep. Walk through one last time looking for anything left behind or dropped, and confirm the site looks like wilderness, not a campsite.
The principle is Leave No Trace (Chapter 21, in full): pack out everything you brought, leave nothing, and leave the site so the next person, and the wildlife, find it pristine. This is the ethic that keeps the backcountry worth visiting, and breaking camp cleanly is where you live it out. Take pride in a site left perfect.
Trail Notes
- Choose a campsite on durable flat ground, 200 ft (~70 steps) from water and trails, sheltered from wind, clear of dead branches overhead, with good drainage. Use established sites.
- Set up in order with daylight to spare: prep spot → pitch tent → sleeping gear → kitchen (separate) → water and food storage. Shelter first.
- Pitch taut, door away from wind, head uphill on slopes, floor cleared.
- Keep kitchen/eating separate from the tent (critical in bear country); cook in the open; keep it clean.
- Change into dry camp clothes, stay warm and fed, enjoy the evening, camp is the reward.
- Break camp cleanly: pack up, police every scrap, naturalize, final sweep. Leave no trace.
Rookie Mistakes
- Camping right next to the water. It harms the source, blocks wildlife, and often breaks the rules. Back off 200 ft.
- Ignoring what’s overhead. Dead branches and leaning trees kill people in wind. Always look up before you pitch.
- Setting up camp in the dark. Rushed, cold, error-prone. Arrive early and build camp with light to spare.
- A sloppy, loose tent pitch. It sags, leaks, and flaps all night. Pitch taut and stake it out.
- Leaving micro-trash behind. The scraps you don’t see are the ones wildlife find. Police the site meticulously; leave it pristine.
FAQ
How do you choose a good campsite? Look for durable, flat ground at least 200 feet (about 70 steps) from water and trails, with some wind shelter, good drainage, and nothing dead overhead that could fall. Use an existing established site wherever one exists, rather than creating a new one, this concentrates impact and protects untouched ground. Screen for safety, comfort, and low impact together.
How far from water should you camp? At least 200 feet, roughly 70 adult steps, from lakes, streams, and other water sources (and from trails). This protects water quality from contamination, lets wildlife reach the water they need, and preserves solitude and low impact. It’s a core Leave No Trace guideline, and many areas require it. When in doubt, camp farther back.
In what order should you set up camp? Choose and clear your tent spot, pitch and secure the tent, set up your sleeping gear (inflate the pad, loft the bag), then establish your kitchen area separately from the tent, and finally handle water and food storage. Do it all with daylight to spare. Setting up shelter first means you’re protected if weather or darkness arrives early.
Where should you set up your camp kitchen? Well away from your sleeping tent, a good distance and ideally downwind, on a stable surface, and always cook in the open air, never inside a tent. This separation means food odors and any animals they attract stay away from where you sleep, which matters especially in bear country. Keep the kitchen organized and clean, and store all food and scented items properly after eating.
What does it mean to break camp? Breaking camp is packing up and leaving your campsite, ideally cleaner than you found it. Pack all your gear, meticulously police the area for every scrap of trash and food (including tiny bits), naturalize the site so it looks undisturbed, and carry out everything you brought in. The goal is that no one can tell you camped there, the heart of Leave No Trace.
Read offline
The whole book as one PDF — every chapter, every diagram.