Chapter 23
The Neighbors
Wildlife, plants, and first aid
The wildlife of the backcountry is far less dangerous than the internet fears and far more dangerous when fed than when wild. Statistically, the animals most likely to affect your trip are the small ones, ticks, mosquitoes, not the large ones that star in the nightmares. This chapter gives you the current, correct protocols for every creature and plant you might meet, plus the food storage that keeps big animals wild and the first-aid kit that handles the small stuff. Much of the old advice here has been overturned; read for what’s current.
The Real Risks, In Proportion
Keep wildlife danger in perspective: serious animal attacks on hikers are rare, while the small hazards, ticks (and the diseases they carry), biting insects, and encounters made dangerous by human food, are common and more consequential. Prepare for the likely, respect the rare.
The mental adjustment worth making up front: a beginner’s fear points at bears and mountain lions, but the actual injury statistics point at ticks, mosquitoes, and the consequences of careless food storage. Large-predator attacks are genuinely rare, and the techniques below make them rarer. Meanwhile, a tick the size of a poppy seed can give you a lingering disease, and a fed bear can become a destroyed bear and a real hazard. So we’ll cover the big animals (because you should know what to do) and give equal weight to the small ones (because they’re what you’ll actually deal with). Respect all wildlife, keep your distance, store your food, and the backcountry’s creatures become part of the reward rather than a threat.
Food Storage: The Foundation of Wildlife Safety
Store all food and scented items (toothpaste, sunscreen, trash) securely at night and whenever you leave camp, in a bear canister (required in many areas and the most reliable method), a provided bear locker, or a proper hang where allowed. This protects your food, keeps you safe, and keeps wildlife wild.
This is the single most important wildlife practice, so it leads the chapter. Animals from mice to bears are drawn to human food and its smells, and an animal that gets a meal from campers learns to seek more, becoming bolder, more aggressive, and often ultimately killed as a “problem animal.” A fed bear is a dead bear, as the saying goes, and it’s literally true. Proper food storage protects the animals and you. Your options, in order of reliability:
- Bear canister: a hard-sided, bear-proof container that holds your food and smellables. It’s required in many popular areas (and you must use it there), and it’s the most reliable method, bears can’t open it, and it needs no trees. Pack all food, trash, and scented items inside, and place it away from camp (and away from cliffs or water where a bear could knock it). Bulky and a few pounds, but foolproof.
- Bear locker: metal food-storage boxes provided at many established backcountry campsites. Use them where available.
- Bear hang: where canisters aren’t required and trees are suitable, hanging food from a tree (next section) is the traditional method, but it’s harder to do well than it looks, and it’s increasingly considered a backup rather than the standard, because bears have learned to defeat poor hangs.
Whatever the method, the rules are constant: never store food (or anything scented) in your tent, store everything smellable (not just food, toothpaste, sunscreen, chapstick, trash, the clothes you cooked in), and do it every night and whenever you leave camp. Check your specific area’s regulations, many require a canister, and using one isn’t optional there.
How to Hang a Bear Bag
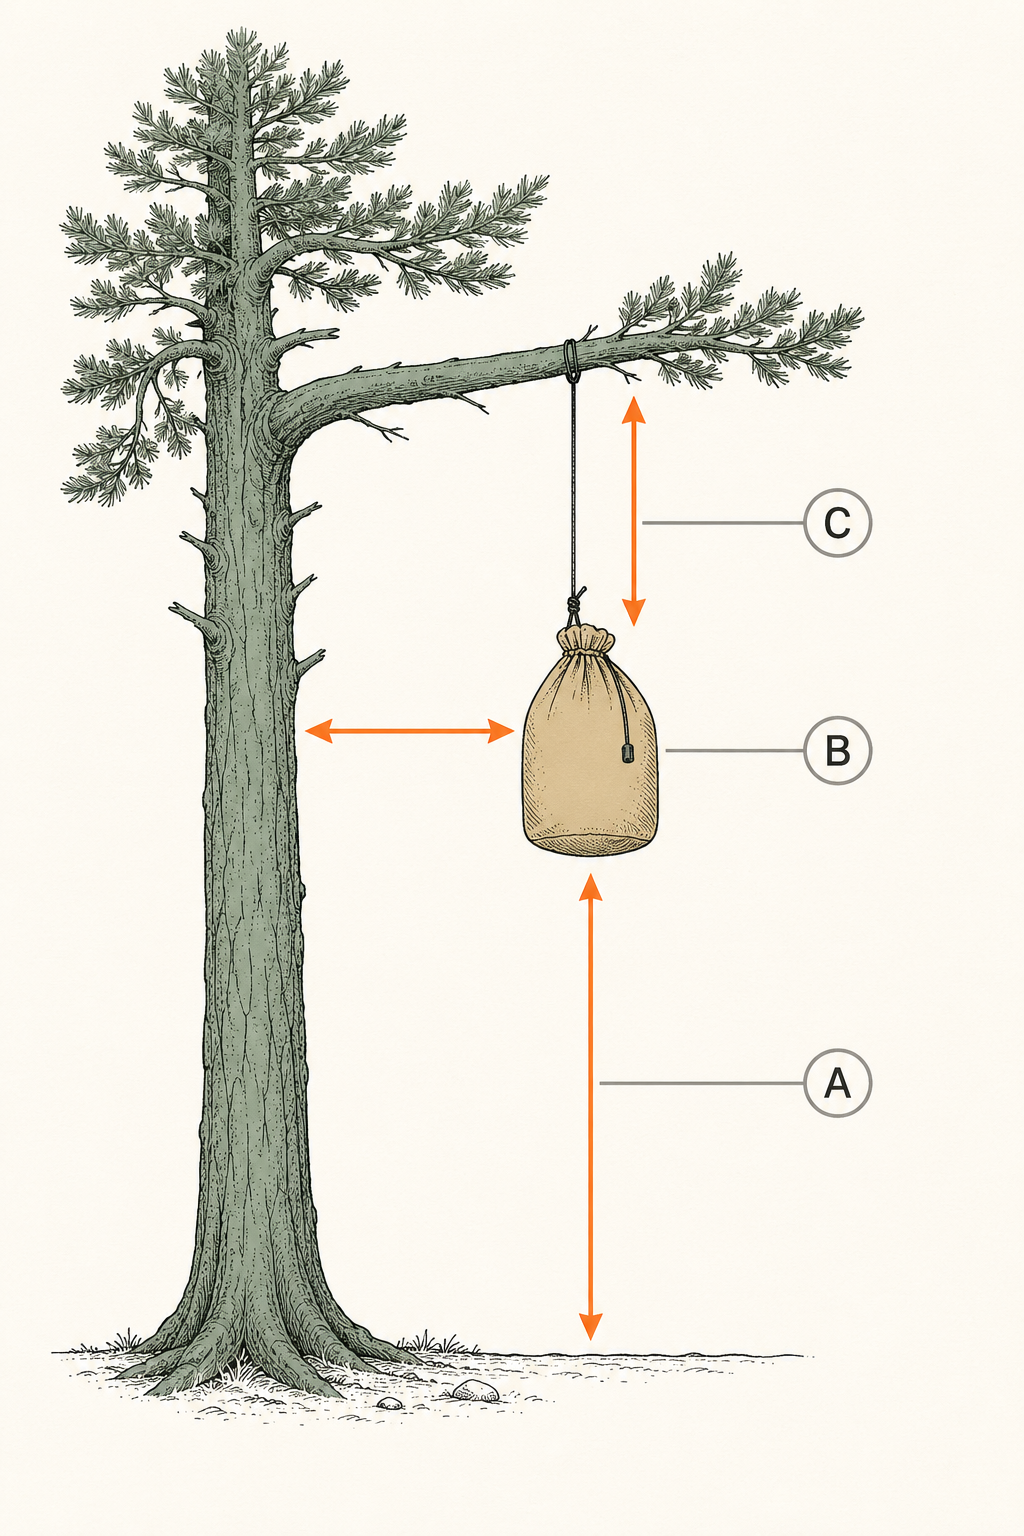
Where hanging is appropriate, hang your food bag at least 10–12 feet (3–3.5 m) off the ground and 4–6 feet (1.2–2 m) out from the tree trunk and any branch, so a bear can’t reach it from the ground, the trunk, or the limb. The counterbalance and PCT methods are the common techniques.
If you’re somewhere a hang is allowed and appropriate (not bear-canister-required country), here’s the target: the bag must end up at least 10–12 feet high, and 4–6 feet away from the trunk and from the branch it hangs on, out of reach from every direction a bear can approach. The common method today is the PCT hang: throw a line over a sturdy branch, tie your food bag on, hoist it up, then use a stick or carabiner to lock it high on the line so it can’t be reached. (The older counterbalance method, splitting food into two bags balanced over the branch, also works.) The reality: a good hang is genuinely hard to achieve, finding the right branch, getting the line over it, reaching the heights, and a bad hang is worse than useless (it just delivers your food to a bear with practice). This is a big reason canisters have become standard. If you hang, practice the technique, carry enough cordage (40+ feet / 12+ m), and be honest about whether you achieved a real hang. When in doubt, or where required, use a canister.
What to Do If You See a Bear
Most bear encounters end peacefully. If you see a black bear (the species in most of the U.S.), stay calm, don’t run, make yourself known by talking firmly and looking big, back away slowly, and give it space and an escape route. Never approach, never feed, and never get between a bear and its cubs or food.
Black bears, the bear you’re overwhelmingly most likely to meet, generally want nothing to do with you, and most encounters are a bear leaving. If you see one:
- Stay calm and don’t run. Running can trigger a chase instinct; you can’t outrun a bear. Keep facing it.
- Make yourself known and look big. Talk in a firm, calm voice and raise your arms to appear larger, so the bear clearly identifies you as a human (not prey).
- Back away slowly, giving the bear a clear escape route. Don’t corner it. Head the way you came.
- Never approach or feed it, never get between a mother and cubs or a bear and its food, and pick up small children and keep pets leashed.
If a black bear approaches or tries for your food, act big and aggressive, shout, wave, make noise, throw things, stand your ground, black bears are usually bluffing and will retreat from a assertive human. Do not play dead with a black bear. In the extremely rare event a black bear actually attacks (as opposed to bluff-charging), fight back, aiming for the face and muzzle. Carry bear spray in areas with bears, keep it accessible (not buried in your pack), and know how to use it, it’s highly effective at stopping an aggressive bear.
Safety — grizzly/brown bears In grizzly country (parts of the northern Rockies, Alaska, Canada), the response differs and you must learn the local guidance. The general rule: for a defensive grizzly encounter (a surprised bear, a mother protecting cubs), use bear spray and, if attacked, play dead (lie face down, protect your neck), the opposite of black-bear advice. Fight back only if the attack is prolonged or predatory. Because the right response depends on the species and situation, research the specific bears where you’re going and carry (and know how to use) bear spray.
Mountain Lions and Other Predators
Mountain lion encounters are very rare, but if you meet one: do not run, make yourself look large, maintain eye contact, make noise, and fight back if attacked. The advice is essentially the opposite of running, you must not act like prey.
Mountain lions (cougars) are elusive and encounters are genuinely uncommon, but the correct response is worth knowing because it’s counterintuitive:
- Do not run and do not crouch or turn your back. Running or crouching makes you look like prey and can trigger a chase or pounce.
- Look as large as possible. Raise your arms, open your jacket, stand tall. Pick up small children so they don’t run or look like prey.
- Maintain eye contact and make noise. Speak loudly and firmly, shout. Show the lion you’re a threat, not a meal.
- Back away slowly if the lion allows, keeping it in view.
- If attacked, fight back aggressively, mountain lions can be driven off by a determined fight; protect your head and neck and use anything available (rocks, sticks, poles, bear spray).
The theme across large predators: don’t act like prey. Stand tall, make noise, don’t run, and fight back if it comes to that. These encounters are rare and rarely end in attack, but knowing the response removes the panic.
Ticks and Lyme Disease
Ticks are the most consequential wildlife hazard for many hikers because they transmit diseases like Lyme disease. Prevent bites with repellent and clothing, check yourself thoroughly after every hike, and remove any attached tick promptly and correctly, with fine-tipped tweezers, pulling straight out.
Here’s the small animal that deserves more attention than the bears. Ticks latch on as you brush through vegetation and can transmit Lyme disease and other illnesses, some serious, especially if attached for many hours. Prevention and prompt removal are your defense:
Prevention:
- Use repellent: DEET or picaridin on skin, and permethrin treatment on clothing and gear (permethrin actually kills ticks on contact and is highly effective, apply to clothing in advance, not skin).
- Cover up in tick habitat: long sleeves and pants, tuck pant legs into socks (dorky, effective), light colors so you can spot ticks.
- Stay on trails, avoiding brushing through tall grass and brush where ticks wait.
Check and remove:
- Do a thorough tick check after every hike, and daily on trips, including hidden spots (scalp, behind ears and knees, armpits, groin, waistband). Have a partner check your back, or use a mirror.
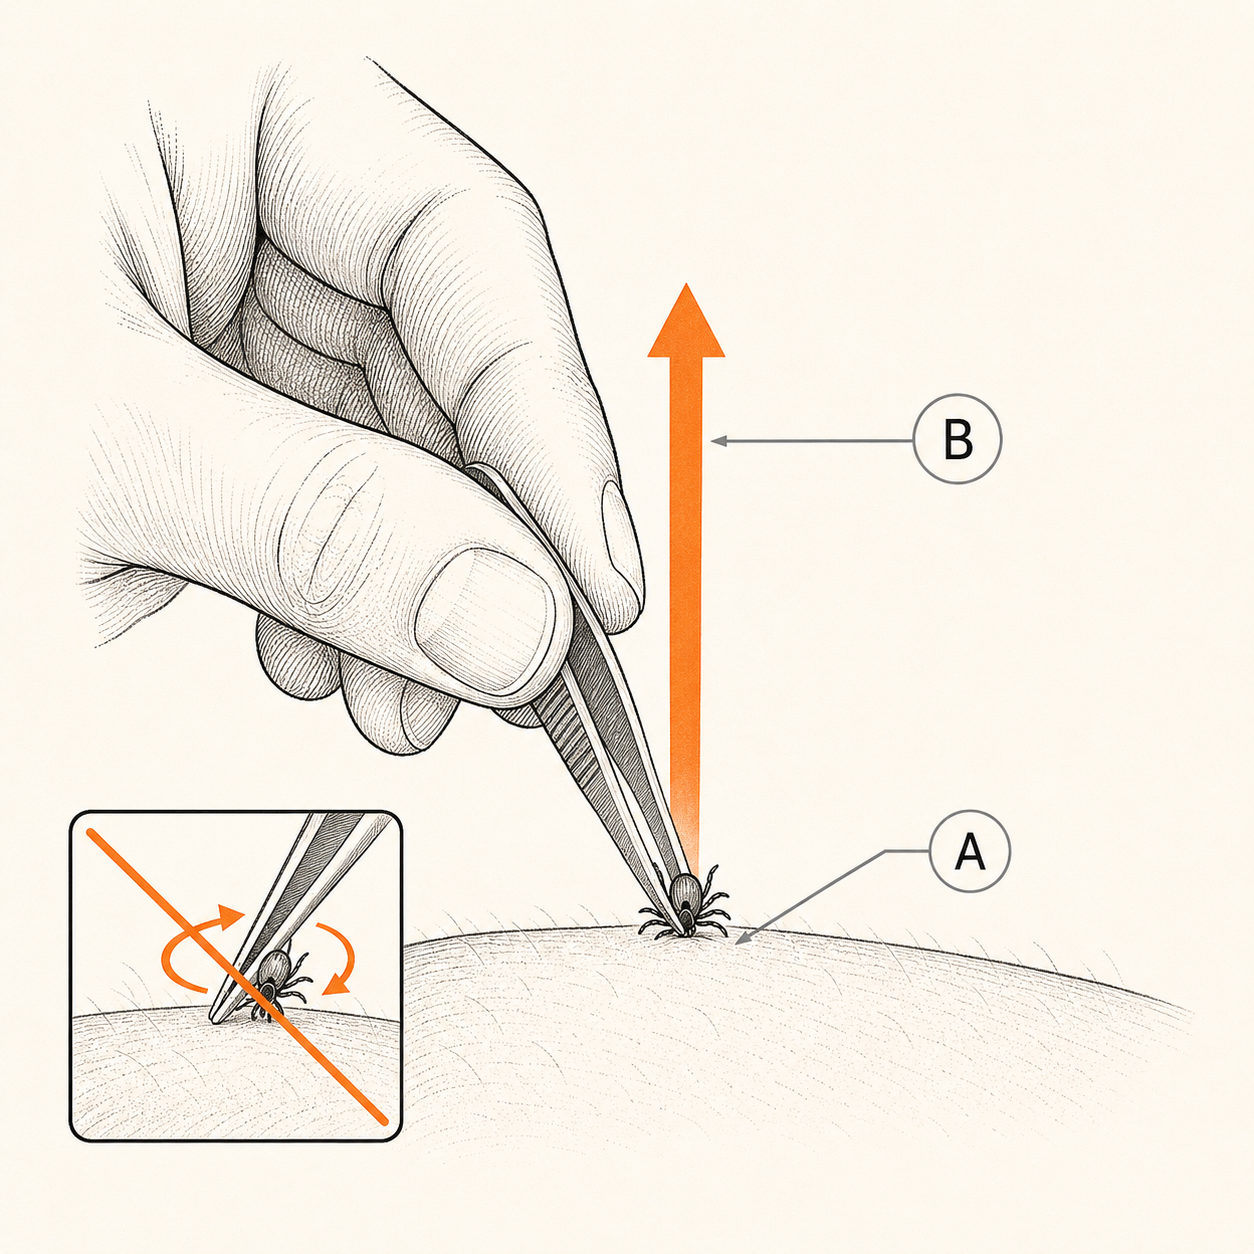
- Remove an attached tick correctly: use fine-tipped tweezers, grasp the tick as close to the skin as possible, and pull straight upward with steady, even pressure, don’t twist, jerk, or crush it, which can leave mouthparts behind or squeeze pathogens in. Then clean the bite with alcohol or soap and water.
- Watch for symptoms afterward: a bull’s-eye rash (a classic but not universal Lyme sign) or flu-like symptoms, fever, aches, fatigue, in the days to weeks after a bite. See a doctor promptly if they appear; Lyme and other tick diseases are treatable with antibiotics, especially when caught early. If you can, note the date and save the tick.
Forget the folk removal methods, burning the tick, smothering it with petroleum jelly, unscrewing it. Those are discredited and can make it worse. Fine tweezers, straight out, is the current standard.
Snakes and Snakebite
Snakes generally avoid people; most bites happen when snakes are handled or stepped on. Prevent bites by watching where you step and reach, and giving any snake a wide berth. If bitten by a venomous snake, stay calm, keep still, and get to medical care fast, modern first aid is not cutting, sucking, or tourniquets.
Venomous snakes (rattlesnakes across much of the U.S.) want to avoid you and bite defensively when surprised or provoked. Prevention is nearly the whole story: watch where you put your feet and hands, don’t step or reach where you can’t see (over logs, into rock crevices, tall grass), stay on trails, and if you hear a rattle, freeze, locate the snake, and back away, give it distance. Never handle, poke, or approach a snake (a surprising number of bites happen to people messing with them). Most snakes you’ll simply never notice.
If a venomous snakebite happens, the modern protocol is very different from the old folklore:
- Stay calm and move away from the snake to avoid a second bite. Keep the victim calm and still, panic and exertion speed venom spread.
- Keep the bitten limb still and roughly at or below heart level. Remove rings, watches, and tight clothing near the bite before swelling starts.
- Get to medical care as fast as safely possible. Antivenom is the real treatment, and it’s in a hospital. Call for rescue / evacuate. Note the time of the bite and any spreading symptoms.
Safety — do NOT cut the wound, try to suck out venom (by mouth or with a suction device, the “Extractor”-style kits are discredited and ineffective), apply a tourniquet, pack it in ice, or give alcohol or caffeine. These old “snakebite kit” methods cause harm and don’t help. The single effective treatment is getting to a hospital for antivenom. Most bites, treated promptly, are survivable, panic and bad first aid cause more harm than the bite’s delay.
Poison Ivy, Oak, and Sumac
Learn to identify and avoid poison ivy, oak, and sumac, plants whose oil causes an itchy, blistering rash. “Leaves of three, let it be” is the classic reminder for ivy and oak. If exposed, wash the oil off skin and gear promptly to reduce or prevent the reaction.
These plants cause an allergic skin rash (itchy, red, often blistering) via an oil called urushiol on their leaves, stems, and roots. Identification is the first defense: poison ivy and poison oak typically have leaves in clusters of three, hence “leaves of three, let it be”, though appearance varies by region and season (learn the local look). Poison sumac (in wet areas) has rows of leaflets. Avoid contact with any plant you can’t confidently rule out.
If you contact these plants:
- Wash the oil off ASAP. Urushiol binds to skin within minutes but washing soon after, with soap and water, or a dedicated poison-ivy wash, can reduce or prevent the rash. Rinse well.
- Wash your gear and clothing too. The oil clings to fabric, boots, poles, and pet fur and can cause reactions days later on contact, so decontaminate anything that touched the plant.
- Treat the rash if it develops: it’s usually a self-limited misery managed with anti-itch creams (hydrocortisone, calamine), antihistamines, and cool compresses. See a doctor if it’s severe, widespread, on the face or genitals, or shows signs of infection.
The rash isn’t contagious (you can’t spread it to others or across your body once the oil is washed off), but any lingering oil can, so decontaminate thoroughly.
The Hiking First-Aid Kit
Carry a compact first-aid kit suited to hiking, and, more importantly, know how to use it. It should cover the common trail injuries (blisters, cuts, sprains, aches, allergic reactions) plus a few items for bigger problems, scaled to your trip’s length and remoteness.
The kit is only as good as your ability to use it, so pairing it with knowledge (a wilderness first-aid course is the best investment a serious backpacker can make, more valuable than any gear) matters more than the contents. A solid hiking first-aid kit includes:
- Blister care (the most-used items): moleskin, blister bandages, Leukotape (Chapter 5).
- Wound care: adhesive bandages in various sizes, gauze pads, medical tape, antiseptic wipes, antibiotic ointment, and a way to clean wounds (irrigate with treated water).
- Medications: pain/anti-inflammatory (ibuprofen, acetaminophen), antihistamine (for allergic reactions, and know if anyone carries an epinephrine auto-injector for severe allergies), anti-diarrheal, any personal prescriptions, electrolyte tablets.
- Tools: fine-tipped tweezers (ticks and splinters), small scissors, safety pins, nitrile gloves.
- Support: an elastic wrap for sprains, and knowledge of how to improvise a splint or wrap with your gear.
- Emergency items: a small emergency guide/card, and your emergency communication (Chapter 16) for serious situations.
Scale the kit to the trip, a short popular trail needs less than a remote multi-day route. Restock it after each trip. And repeat the key point: take a wilderness first-aid class. Knowing how to assess an injury, treat it, and decide whether to evacuate is worth more than any amount of gear, and it turns the anxious beginner into the calm, capable person others are glad to hike with.
Trail Notes
- Keep it in proportion: big-predator attacks are rare; ticks, insects, and food-conditioned animals are the real common hazards.
- Food storage is the foundation: bear canister (required in many areas, most reliable), bear locker, or proper hang. Never food or smellables in the tent. A fed bear is a dead bear.
- Bear hang (where allowed): 10–12 ft (3–3.5 m) up, 4–6 ft (1.2–2 m) from trunk and branch. Hard to do well, canisters are now standard.
- Black bear: don’t run, look big, back away; act aggressive if approached, fight back if attacked, don’t play dead. Grizzly: different rules, carry bear spray, learn local guidance. Mountain lion: don’t run, look big, fight back.
- Ticks: prevent (permethrin on clothes, DEET/picaridin on skin, cover up, check daily), remove with fine tweezers straight up, watch for rash/flu symptoms, Lyme is treatable early.
- Snakebite: stay calm, immobilize, keep limb at/below heart, evacuate fast. Do NOT cut, suck, tourniquet, or use suction kits, those are discredited. Poison ivy/oak: “leaves of three, let it be”; wash oil off skin and gear fast.
- Carry a first-aid kit scaled to the trip, and take a wilderness first-aid course, worth more than any gear.
Rookie Mistakes
- Fearing bears while ignoring ticks. The poppy-seed tick is the likelier threat. Prevent, check, and remove ticks correctly.
- Storing food (or toothpaste) in the tent. It draws animals to your bed and can doom the animal. Store all smellables properly, every night.
- Trusting a sloppy bear hang. A bad hang just trains the bear. Learn the technique or use a canister, and use a canister where required.
- Old snakebite “first aid.” Cutting, sucking, suction kits, and tourniquets are discredited and harmful. Immobilize and evacuate to antivenom.
- Carrying a first-aid kit you can’t use. Gear without skills is theater. Take a wilderness first-aid course.
FAQ
What should you do if you see a bear? For a black bear (most common): stay calm, don’t run, talk firmly and make yourself look large, and back away slowly, giving it space and an escape route. If it approaches, get aggressive, shout, wave, throw things; if it attacks, fight back. Never run, feed it, or get between a mother and cubs. Grizzly country has different rules (often play dead if attacked), so learn local guidance and carry bear spray.
How do you remove a tick correctly? Use fine-tipped tweezers, grasp the tick as close to the skin as possible, and pull straight upward with steady, even pressure, don’t twist, jerk, or crush it. Then clean the bite with alcohol or soap and water. Skip the folk methods (burning, petroleum jelly, unscrewing); they’re discredited. Watch for a rash or flu-like symptoms afterward and see a doctor promptly if they appear, tick diseases are treatable, especially early.
Do I need a bear canister for backpacking? In many popular areas, yes, a bear canister is required, and using one is not optional there. Even where it isn’t required, it’s the most reliable food-storage method: bears can’t open it, and it works without suitable trees for hanging. Always check your specific area’s regulations. Store all food and scented items in it, place it away from your tent, and never keep food in your tent.
What’s the current first aid for a snakebite? Stay calm, move away from the snake, keep the victim still, immobilize the bitten limb at or below heart level, remove tight items before swelling, and get to a hospital fast, antivenom is the real treatment. Do NOT cut the wound, suck out venom, use a suction “extractor” kit, apply a tourniquet, or ice it; those methods are discredited and harmful. Prompt medical care is what saves lives.
How do you avoid poison ivy and poison oak? Learn to identify them, poison ivy and oak usually have leaves in clusters of three (“leaves of three, let it be”), and avoid contact, staying on trails and away from unidentified plants. If you touch them, wash the oil (urushiol) off your skin with soap and water as soon as possible, and wash your clothing, gear, and pet fur too, since the oil clings and can cause a rash on later contact.
Read offline
The whole book as one PDF — every chapter, every diagram.