Chapter 17
Trail Legs
Conditioning, pace, and crossings
The gear is packed and the trip is planned; now the trail itself asks something of your body. Backpacking is a physical skill as much as a logistical one, and the difference between a trip you endure and one you enjoy is largely fitness, pacing, and technique. This chapter builds the engine, how to train for the load, how to pace so you last all day, how to fuel and hydrate, and how to handle the two bits of terrain that intimidate beginners most: steep ground and moving water.
How to Train for Backpacking
Train for backpacking by doing progressively longer hikes with a loaded pack, plus general cardio and some leg and core strength work. The single most specific and effective training is walking with weight on your back, building up gradually over weeks.
Backpacking fitness is specific: it’s the ability to walk for hours over uneven terrain carrying a load, and the best way to build it is to do that, scaled up gradually. The plan:
- Hike regularly, building distance. This is the day-hiking progression from Chapter 1, the foundation of all backpacking fitness. Regular hikes condition exactly the right muscles, joints, and cardiovascular system.
- Add pack weight progressively. Start carrying a loaded pack on training hikes, begin light and build toward your actual trip weight over several weeks. Loaded walking trains your body for the real demand and reveals fit problems before the trip.
- Include general cardio. Any aerobic exercise, walking, cycling, running, stair-climbing, builds the endurance base. Uphill work (hills, stairs, an inclined treadmill) is especially transferable.
- Strengthen legs and core. Squats, lunges, step-ups, and core work build the strength that carries a pack and protects knees and back on descents.
The key word is progressive. Give your body weeks, not days, to adapt, tendons and joints strengthen slowly (Chapter 1’s lesson again). And don’t neglect downhill training: descending with a pack is uniquely hard on quads and knees, and it’s what leaves untrained hikers wrecked. Practice it.
Finding Your Sustainable Pace
Hike at a pace you can sustain all day, slow enough to breathe comfortably and hold a conversation, not so fast you burn out. Consistent, steady movement covers more ground with less misery than bursts of speed followed by long rests.
The beginner instinct is to charge, especially early when you’re fresh and excited; the result is burning out and a slog to camp. The experienced approach is a steady, sustainable rhythm, often unimpressively slow-looking, but relentless, and it covers remarkable distance. The calibration tool is your breath: the conversational pace (Chapter 1) is the sweet spot, if you can talk in full sentences, you’re sustainable; if you’re gasping, slow down. On climbs, this often means slowing dramatically and taking small steps rather than stopping, which brings us to a specific technique.
The rest step is the mountaineer’s trick for steep, sustained climbs: with each step, briefly lock your rear leg straight and pause a fraction of a second, letting your skeleton (not your muscles) bear the weight for that instant before the next step. It looks slow and feels almost lazy, but it lets you climb long grades without stopping, giving your muscles a micro-rest every stride. On a big climb, the rest step is the difference between plodding steadily to the top and stopping every twenty feet gasping.
Rest Breaks and Rhythm
Take regular, short rest breaks rather than infrequent long ones, a few minutes every hour or so to drink, snack, adjust gear, and check the map keeps you fueled and moving without stiffening up. Listen to your body and rest before you’re wrecked.
The rhythm that works for most hikers: walk steadily for 45–60 minutes, then take a short break (5–10 minutes) to drink, eat something, shed or add a layer, check navigation, and let your legs recover a little. This beats the alternative of pushing until you collapse and then needing a long recovery. Short frequent breaks keep your energy and hydration topped up and your muscles from stiffening. Use breaks productively, the “drink, snack, adjust, navigate” checklist, and try not to sit so long you cool down and stiffen (especially in cold weather). Above all, rest before you’re exhausted, not after; managing your energy proactively across the day is what lets you finish strong instead of limping into camp.
Hydration and Electrolytes
Drink regularly throughout the day, small amounts often, and on long, hot, or sweaty days replace electrolytes (salts), not just water, because sweating depletes salts and drinking only plain water can dilute them dangerously. Aim to drink before you feel thirsty.
Chapter 4 covered how much water to carry (about half a liter per hour, more in heat); here’s the refinement for hard efforts. When you sweat heavily for hours, you lose not just water but electrolytes, sodium, potassium, and other salts your body needs to function. Replacing the water but not the salts can, in extreme cases, dilute your blood sodium dangerously (a condition called hyponatremia), so on long, hot, sweaty days, add an electrolyte source: drink mixes or tablets, or simply eat salty snacks alongside your water. This matters most on big efforts in the heat; on a cool short hike, plain water is fine. The steady habit remains: drink small amounts regularly, before thirst hits (thirst lags behind actual need), and monitor your urine, pale means well-hydrated, dark means drink more. Good hydration protects not just comfort but judgment and safety, since dehydration degrades both (Chapter 22).
How to Cross a Stream Safely
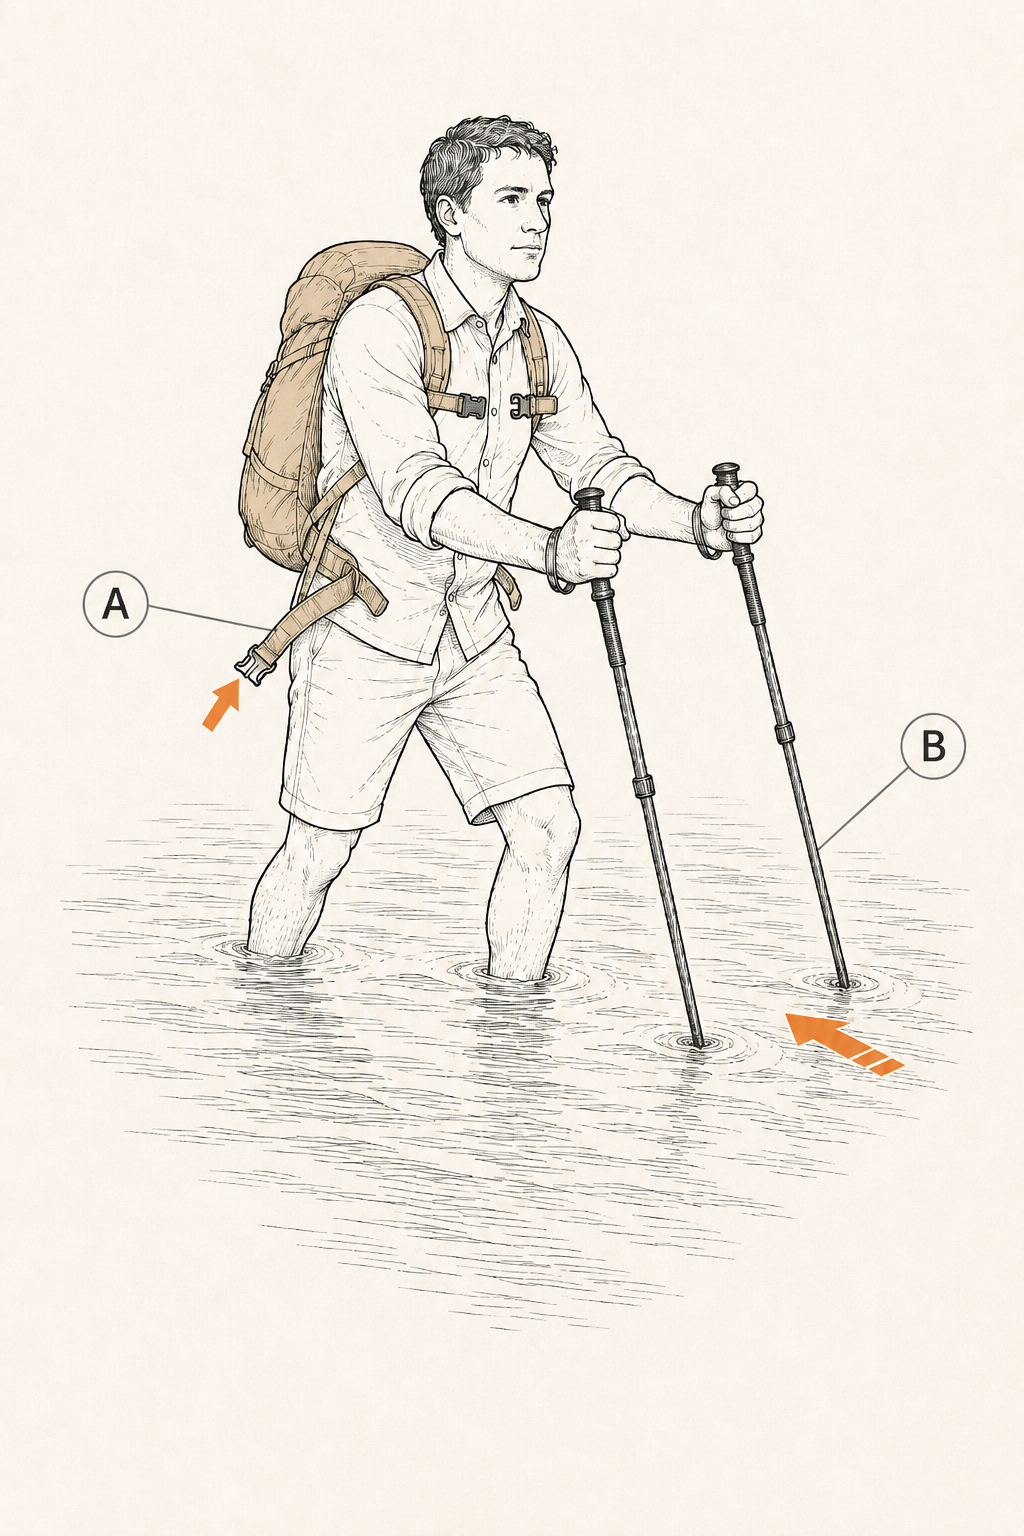
Cross moving water carefully: unbuckle your pack’s hip belt first, keep your shoes on, face slightly upstream, use trekking poles or a stick for a third point of contact, and move one foot at a time. If the water looks too deep, fast, or cold, don’t cross, find another way.
Stream crossings intimidate beginners for good reason, moving water is powerful and a bad crossing is genuinely dangerous, but the technique makes most trail crossings manageable:
- Scout for the best spot. Look for the widest, shallowest, slowest section (wider usually means shallower and slower). Avoid crossing directly above hazards like rapids or falls.
- Unbuckle your hip belt (and sternum strap). This is critical: if you fall, you must be able to shed the pack instantly so it doesn’t trap you underwater. A buckled hip belt can pin you to the bottom.
- Keep footwear on. Bare feet slip and get injured on the streambed. Keep your shoes (or wear camp shoes/sandals) for grip and protection.
- Face slightly upstream and angle across. Don’t face downstream, the current can buckle your knees. Lean slightly into the current.
- Use poles or a stick. A trekking pole or found stick planted upstream gives you a stable third point of contact. Move only one point at a time, two feet and a pole means always two planted.
- Shuffle, don’t cross your feet. Move one foot, get it stable, then the other. Small, deliberate steps.
Safety The most important stream-crossing skill is knowing when not to cross. Water that’s too deep (above the knees for a fast current), too fast (you can’t stand steadily in it), or too cold can kill even strong swimmers. Fast water at mid-thigh can sweep you off your feet. If a crossing looks dangerous, turn back or find another route, no destination is worth drowning for. Snowmelt-fed streams are often lowest in the early morning and highest in late afternoon, so timing can help.
Handling Steep and Difficult Terrain
On steep or rough terrain, shorten your stride, use trekking poles, keep your weight balanced over your feet, and slow down, most trail injuries happen on descents, where fatigue and momentum combine. Test footing before committing weight, especially on loose or wet surfaces.
Steep ground rewards technique over power. Climbing: shorten your steps, use the rest step, and keep a steady slow rhythm; switchback across very steep sections rather than charging straight up. Descending is where the real hazard lives, it’s harder on your body and where most falls and injuries occur, because gravity adds momentum and quads fatigue fast. Descend with control: shorten your stride, use poles for balance and braking, keep your knees soft and bent, and resist the urge to let momentum run away with you. On loose surfaces (scree, gravel) plant each foot deliberately and test it; on wet rock, roots, or mud, assume slipperiness and slow down. And use your poles, they turn a two-legged balance problem into a four-legged stable one, exactly when you need it (Chapter 12). The overarching rule on hard terrain: slow down. Speed is where beginners get hurt.
Trail Notes
- Train specifically: progressively longer hikes with a loaded pack, plus cardio and leg/core strength. Practice descending, it wrecks the untrained.
- Hike a sustainable, conversational pace, steady beats bursts. Use the rest step (lock the rear leg, brief pause) on sustained climbs.
- Take short frequent breaks (a few minutes hourly) to drink, snack, adjust, navigate. Rest before you’re wrecked.
- Drink small amounts regularly before thirst; replace electrolytes on long hot sweaty days, not just water.
- Cross streams: hip belt unbuckled, shoes on, face upstream, poles planted, one foot at a time. Too deep/fast/cold = don’t cross.
- On steep terrain, slow down and shorten stride, descents cause most injuries. Test footing on loose or wet ground.
Rookie Mistakes
- Charging out fast and burning out. The steady slow hiker reaches camp fresh; the sprinter limps in. Pace conversationally.
- Training without the pack. Loaded walking is the specific skill. Unloaded fitness doesn’t fully transfer to carrying weight.
- Only drinking water on a hot all-day sweat-fest. Replace electrolytes too, or risk dangerous dilution. Salty snacks count.
- Crossing a stream with the hip belt buckled. A fall can pin you underwater. Unbuckle before every crossing, always.
- Bombing downhill. Momentum plus fatigue equals most trail injuries. Shorten your stride, use poles, keep knees soft.
FAQ
How do I train for a backpacking trip? Do progressively longer hikes carrying a loaded pack, the most specific and effective training, plus general cardio (especially uphill work) and leg and core strength (squats, lunges, step-ups). Build up over weeks, not days, since joints and tendons strengthen slowly, and specifically practice descending with weight, which is what leaves untrained hikers wrecked.
How fast should you hike? At a pace you can sustain all day, slow enough to breathe comfortably and talk in full sentences. Steady, consistent movement covers more ground with less misery than fast bursts followed by long rests. On sustained climbs, use the rest step (briefly lock your rear leg each stride) to keep moving without stopping. Typical loaded pace is around 2 miles (3 km) per hour.
Do I need electrolytes for hiking? On long, hot, or sweaty days, yes, heavy sweating depletes salts, and drinking only plain water can dilute your blood sodium dangerously. Add electrolyte drink mixes or tablets, or eat salty snacks alongside your water. On short or cool hikes, plain water is fine. The constant is to drink small amounts regularly, before you feel thirsty.
How do you safely cross a river while hiking? Scout for the widest, shallowest, slowest spot; unbuckle your pack’s hip belt so you can shed it if you fall; keep your shoes on; face slightly upstream and lean into the current; use trekking poles for a third contact point; and shuffle one foot at a time. Most important: if the water looks too deep, fast, or cold, don’t cross, find another way.
Why do my knees hurt hiking downhill? Descending drives large forces through your knees with every step, especially under a pack, and controls fatigue quickly. Reduce it by using trekking poles to offload force, shortening your stride, keeping knees soft and bent, and slowing down. Strengthening your quads and practicing loaded descents in training also helps. Persistent knee pain warrants attention to fit, form, and possibly a medical opinion.
Read offline
The whole book as one PDF — every chapter, every diagram.