Chapter 10
The One-Burner Kitchen
Stoves and cookware
A hot dinner after a long day and a hot drink at a cold dawn are two of backpacking’s genuine pleasures, and a small stove delivers both from a device that fits in your cook pot. Stoves used to be temperamental gadgets you fought with; the modern canister stove is nearly foolproof. This chapter picks one, runs it safely, and keeps the rest of the kitchen minimal.
Do You Even Need a Stove?
You don’t strictly need a stove, many backpackers eat no-cook meals and skip it entirely, but a stove makes hot food and drink easy, and for most people that comfort is worth the modest weight. Decide based on your trips and your tolerance for cold dinners.
It’s worth naming the no-cook option up front, because it’s a legitimate and increasingly popular choice covered fully in Chapter 19: bars, jerky, cheese, tortillas, cold-soaked meals in a jar. No stove, no fuel, no cleanup, less weight. If you’re going ultralight or just keeping your first trips dead simple, going stoveless is completely valid. But for most beginners, a hot meal is morale and a hot drink is comfort, and a small stove buys both cheaply. The rest of this chapter assumes you want one.
Backpacking Stove Types
Backpacking stoves are grouped by the fuel they burn. The two you’ll actually choose between are canister stoves (screw onto a sealed gas canister, simplest, and the default recommendation) and liquid-fuel stoves (burn white gas from a refillable bottle, powerful in cold and at altitude, but more involved). Alcohol and wood stoves exist but are niche.
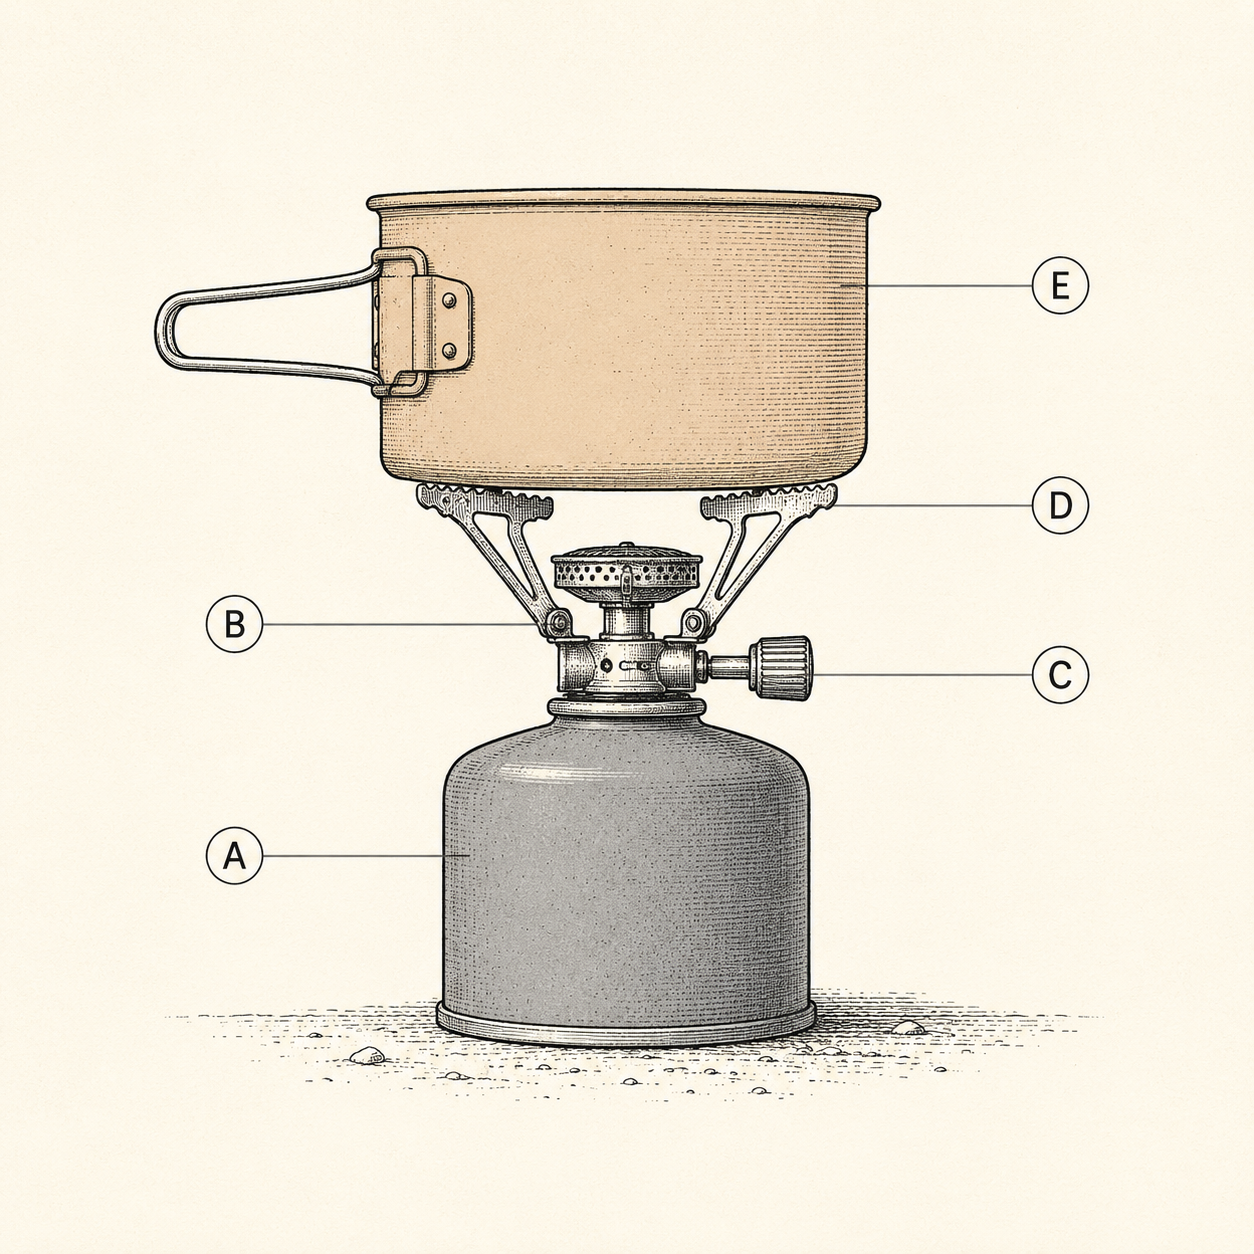
Canister stoves are the modern beginner’s answer: a small burner threads onto a pre-pressurized isobutane-propane canister, you turn the valve, and you light it. No priming, no pumping, near-instant boil, precise flame control for actual cooking. The trade-offs are minor for three-season use: performance drops in deep cold (the canister loses pressure), you can’t see exactly how much fuel is left, and empty canisters must be packed out and recycled.
Liquid-fuel stoves burn white gas from a refillable bottle and require priming (preheating the burner) before they run. They shine where canisters struggle, sustained cold, high altitude, long expeditions where refillable fuel is cheaper and canisters aren’t sold. They’re also more maintenance and more fuss. For summer and three-season trips, most beginners never need one.
Integrated canister systems deserve a mention: these are canister stoves with a built-in heat-exchanger pot that boil water extremely fast and fuel-efficiently. If you mostly boil water for freeze-dried meals and hot drinks (which most beginners do), one of these is a superb, if pricier, choice.
| Canister | Liquid fuel | |
|---|---|---|
| Ease of use | Very easy, no priming | Moderate, priming, pumping |
| Cold & altitude | Weakens in deep cold | Excellent |
| Simmer control | Good | Good, with practice |
| Fuel availability | Widely sold; canister-specific | White gas widely sold; refillable |
| Maintenance | Almost none | Regular cleaning |
| Best for | Three-season beginners | Winter, altitude, expeditions |
How to Use a Canister Stove
Using a canister stove takes four steps: set it on stable ground, screw the burner onto the canister, open the valve slightly and light it, then adjust the flame. Always run it outdoors, on a level surface, away from anything flammable.
- Find stable, level ground. A flat rock beats squatting over dirt, but it must be steady, a tipped stove with a full pot is how burns and spills happen. Clear flammable debris (dry grass, leaves) from around it.
- Attach the burner. Screw the stove onto the canister snugly, hand-tight, not forced. Listen for any hiss of escaping gas; if you hear one, the seal isn’t seated.
- Open and light. Turn the valve a small amount to release gas, you’ll hear it, then light immediately with the stove’s igniter or a lighter/match held to the burner. Don’t let gas build before lighting.
- Adjust and cook. Once lit, set the flame: high to boil, low to simmer. Set your pot on the supports, centered. When done, turn the valve fully off and let everything cool before unscrewing the canister.
Practice this at home before your trip, light it, boil a pot of water, get familiar with the flame, exactly as you practiced the tent. A stove you know is a stove that cooperates when you’re hungry and it’s getting dark.
Stove Safety
Run every fuel-burning stove outdoors only, on stable ground, with fuel and flammables clear, and never inside a tent, vestibule, or any enclosed space, because stoves produce carbon monoxide and can flare or tip.
This is the most important paragraph in the chapter, so it gets stated plainly. Carbon monoxide is odorless, colorless, and can kill you in an enclosed space while you feel only sleepy, every year people die cooking inside tents. Cook in the open air, always. Beyond the carbon-monoxide danger, keep the stove away from your tent and pack (flare-ups happen), keep fuel canisters out of direct sun and away from campfires, let a stove cool fully before packing it, and keep a pot of water or the ability to smother a flare within reach. A stove is safe when respected and dangerous when rushed indoors, treat the “outdoors only” rule as absolute.
Safety Wildfire risk makes stove rules a legal matter, not just a safety one. Many areas impose fire restrictions that ban or limit even canister stoves during dry, high-danger periods. Always check current fire restrictions with the land agency before your trip; Chapter 21 covers this in depth. When restrictions are in force, a stoveless food plan may be your only legal option.
The Camp Kitchen: Cookware
Keep cookware minimal: one pot sized to your group (about 0.75 liter per person for boiling), a way to eat (a long spoon and an insulated mug), and that’s nearly it. Nesting cooksets exist, but most beginners boiling water need far less than they buy.
The modern backpacking kitchen is astonishingly small because the modern backpacking dinner is mostly boil water, add it to food. For that you need one pot with a lid (the lid speeds the boil and saves fuel), a long-handled spoon (reaches the bottom of freeze-dried pouches), and a mug for drinks. Titanium and aluminum pots are light; stainless is heavier but tougher and cheaper. A cozy (an insulated sleeve) lets meals finish cooking off the stove, saving fuel. If you cook actual meals rather than just boiling, add a second small pot or a pan, but try the minimal kit first. Most people discover they never wanted the frying pan.
Skip the plates. Eat straight from the pot or the meal pouch, less to carry, less to wash. A single pot, a spoon, and a mug genuinely covers most backpacking cooking.
Fuel: How Much to Bring
Estimate fuel by how many times you’ll boil water. A rough planning figure: a small (110 g / 4 oz) canister boils roughly 10–12 liters of water, enough for about a weekend of simple meals and hot drinks for one person. Bring a margin, and never fly with fuel.
Fuel planning gets easier with a logbook: note how much you started with and how much was left, and after a couple trips you’ll know your rate. Cold weather, wind, and melting snow burn far more fuel, so pad the estimate generously when it’s cold. Two logistics notes that trip up beginners: you cannot fly with fuel canisters or liquid fuel (buy them at your destination, outdoor shops near trailheads stock them), and partially used canisters are hard to gauge, so weigh them (a kitchen scale, comparing to a full and empty canister) or just start each trip with enough known fuel. Always pack out empty canisters and recycle them properly.
Cooking Over a Fire (and Why Usually Not)
You can cook over a campfire in a pinch, but it’s slower, messier, harder to control, and increasingly restricted or banned, a stove is faster, cleaner, and far more reliable. Learn fire-building as a skill (Chapter 21), but plan to cook on your stove.
Fire cooking has romance and, occasionally, utility if your stove fails. But the reality is coals that take 30–45 minutes to develop, blackened pots, uneven heat, and a real wildfire hazard that has made open fires illegal across large areas for much of the year. The environmental cost (scorched ground, depleted deadwood, fire scars) has turned the backcountry ethic firmly toward stoves. Know how to build a fire for warmth, emergency, and the occasional legal, appropriate campfire, but for dinner, light the stove. It’s the tool the job now belongs to.
Trail Notes
- A stove is optional (no-cook is valid) but buys hot food and drink cheaply. Most beginners want one.
- Canister stoves are the beginner default: screw on, light, cook, no priming. Liquid fuel is for cold, altitude, expeditions.
- Use it outdoors only, on stable level ground, flammables cleared. Practice at home first.
- Never cook inside a tent or enclosed space, carbon monoxide and fire. This rule is absolute.
- Check fire restrictions before every trip; they can ban even canister stoves in dry season.
- Cookware is minimal: one pot (~0.75 L/person), a long spoon, a mug. Eat from the pot. Skip the plates.
Rookie Mistakes
- Cooking in the tent or vestibule to dodge wind or rain. This is the mistake that kills people. Outside, always.
- Skipping the home practice run. A stove you first light while hungry in the dark is a stove that fights you.
- Flying with fuel. It’s prohibited. Buy canisters at your destination.
- Buying the big nesting cookset. You’ll boil water in one pot and carry the rest as dead weight. Start minimal.
- Assuming a fire is your backup dinner plan. Fires are slow, messy, often illegal in dry season. The stove is the plan.
FAQ
What kind of stove is best for beginner backpackers? A canister stove, it screws onto a sealed gas canister and lights instantly with no priming or pumping, boils fast, and controls flame well. For three-season trips it’s the simplest, most reliable choice. If you mostly boil water for freeze-dried meals, an integrated canister system boils even faster and more efficiently.
How do you use a backpacking stove safely? Set it on stable, level ground outdoors, clear of flammables; screw the burner onto the canister hand-tight; open the valve slightly and light immediately; adjust the flame; then turn it fully off and let it cool before disassembly. The absolute rule: never run any fuel-burning stove inside a tent or enclosed space, because of carbon monoxide and fire risk.
Can I use a canister stove in cold weather? Yes, but performance drops as temperatures fall because the canister loses pressure. Near and below freezing, keep the canister warm (in a jacket pocket until use), use a canister with more propane in the blend, or step up to a liquid-fuel stove for sustained cold and altitude. For most three-season trips, a canister stove is fine.
How much fuel do I need for a backpacking trip? Estimate by boils: a small 110 g (4 oz) canister boils roughly 10–12 liters of water, about a weekend of simple meals and drinks for one. Cold, wind, and melting snow burn much more, so pad generously. Log your usage each trip and you’ll soon know your exact rate.
Do I need special cookware for backpacking? Not much. For the boil-water cooking most beginners do, one pot with a lid (about 0.75 liter per person), a long-handled spoon, and an insulated mug covers it, eat straight from the pot or meal pouch. Titanium and aluminum are lightest; stainless is tougher and cheaper. Add a second pot or pan only if you cook real meals.
Read offline
The whole book as one PDF — every chapter, every diagram.