Chapter 9
A Roof That Packs Small
Tents and shelters
Modern tents are one of backpacking’s quiet miracles. A shelter that keeps out rain, wind, and bugs, holds in warmth, and then folds into a bundle you carry on your back, this used to be a fantasy. Today it’s an entry-level purchase. This chapter gets you a tent that goes up in minutes, keeps you dry, and doesn’t dominate your pack.
How to Choose a Backpacking Tent
For most beginners, choose a freestanding, three-season, two-person tent with a full rainfly, it’s the forgiving all-rounder that handles the conditions new backpackers actually meet. Then weigh the trade-offs of weight, space, and price from there.
That one recommendation covers the vast majority of first tents, and the sections below explain each word of it. A tent is the third of the “big three,” and it’s where beginners most often over- or under-buy, chasing either a bargain that leaks and sags or an expensive ultralight shelter that demands skill to pitch. The middle path is a well-reviewed, moderately priced, freestanding double-wall tent, and it will serve you for years.
Understanding Tent “Seasons”
Tents are rated by season, and the label describes weather-handling, not the calendar. A three-season tent handles spring, summer, and fall, rain, wind, and bugs, and is what nearly every backpacker wants. A four-season tent is built to shed snow and survive winter storms; it’s heavier, warmer, and overkill until you’re camping in genuine winter.
Ignore one- and two-season tents (fair-weather only) and don’t reach for four-season until winter mountaineering is actually on your calendar. Three-season is the answer, full stop, for the trips this book is teaching. These tents balance the priorities that matter across most of the year: enough ventilation to manage condensation on warm nights, and a fly and pole structure strong enough for a real rainstorm and moderate wind.
Freestanding vs Non-Freestanding
A freestanding tent stands up on its poles alone, without stakes, pick it up, move it, shake it out. A non-freestanding tent needs stakes and taut guy-lines (or trekking poles) to hold its shape. Freestanding is far easier for beginners; non-freestanding saves weight for those who’ve learned to pitch it.
The freestanding tent forgives everything a beginner does wrong. You can pitch it on a wooden platform or hard-packed ground where stakes won’t bite, reposition it after it’s up, and lift it to shake out debris. Non-freestanding tents (including many ultralight shelters that pitch with your trekking poles) weigh less because they carry no dedicated poles, but they demand good stake placement, taut guy-lines, and a site that accepts stakes, all skills worth having later. Start freestanding. You’ll pitch it correctly on your first try in the dark, which is exactly when that matters.
Single-Wall vs Double-Wall, and the Rainfly
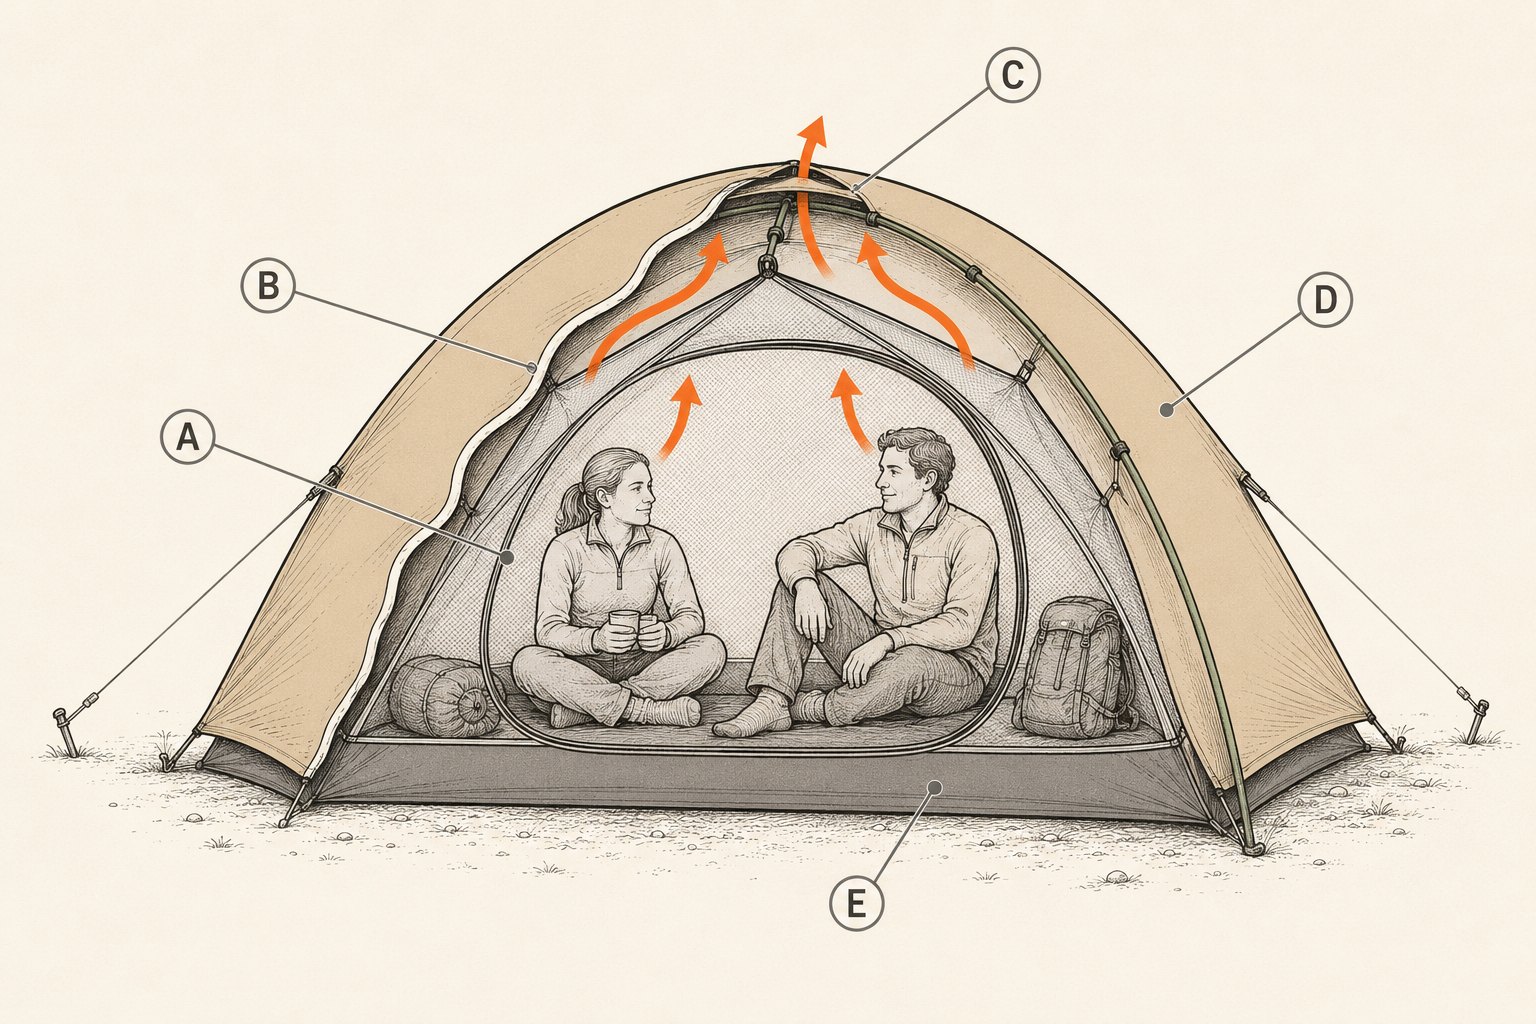
Most good backpacking tents are double-wall: an inner tent (often mostly mesh) plus a separate waterproof rainfly over it. That two-layer design is what keeps you dry from both the rain outside and the condensation you create inside.
Here’s the physics beginners miss: you exhale water vapor all night, and warm moist air hits the cold tent surface and condenses into droplets. A single waterproof wall would rain that condensation back down on you. The double-wall solution is a breathable inner tent that lets your vapor pass through, and a waterproof fly above it with an air gap between, your moisture escapes through the inner and out under the fly, while rain stays outside. This is why a full-coverage rainfly (one that reaches nearly to the ground) matters: partial flies save weight but leave you exposed in wind-driven rain. For your first tent, full-coverage fly, no compromise.
Reading Tent Capacity and Weight
Tent capacity ratings are tight, a “two-person” tent fits two adults shoulder-to-shoulder with no room for gear. If you want space for your pack or a little elbow room, size up one person.
The capacity number assumes bodies packed like sardines, so many pairs buy a three-person tent for two-plus-gear comfort, and many solo hikers buy a two-person tent to sprawl with their gear inside. Only you know your tolerance for coziness; just don’t expect a “two-person” tent to feel like it.
Weight is the number that lives in your pack, and tents list two: packed weight (everything in the bag, tent, fly, poles, stakes, stuff sacks) and trail weight (just the essentials). For real planning, use packed weight, it’s what you actually carry. A reasonable beginner three-season two-person tent runs about 4 to 5 pounds (1.8–2.3 kg); dedicated ultralight tents drop under 3 pounds (1.4 kg) at a steep price premium and often with less durability. For your first tent, a few extra ounces of toughness beats a few grams of bragging rights.
The Footprint Question
A footprint is a ground sheet cut to your tent’s shape that protects the tent floor from abrasion and punctures. It’s useful but optional, a piece of inexpensive polycryo or an old ground cloth does the same job for a fraction of the branded price.
Footprints extend a tent floor’s life and add a little water protection, and they’re worth having. What they’re not worth is the $50-plus manufacturers often charge, when a trimmed sheet of window-insulation film or a cut piece of Tyvek weighs less and costs a few dollars. One rule matters: the ground sheet must not stick out past the tent’s edges. An oversized footprint catches rain and funnels it under your tent, the opposite of the goal. Cut it slightly smaller than the floor, and it protects without collecting a puddle beneath you.
How to Pitch a Tent
Pitch a freestanding tent in a handful of steps: clear and choose the spot, connect the poles, attach the tent body, stake the corners, add the fly, and guy it out taut. Practice at home first, the first pitch should never happen in the dark in the rain.
- Prepare the site. Find flat, durable ground; clear away sticks and stones (they puncture floors and ruin sleep). Lay your footprint if using one.
- Assemble the poles. Shock-corded poles snap together on their own. Lay them out.
- Connect the tent body. Thread poles through sleeves or snap the clips onto them. The tent takes its dome shape and stands up.
- Stake the corners. Even a freestanding tent should be staked so wind can’t move it and the floor stays taut. Push stakes in at about 45 degrees, angled away from the tent.
- Add the rainfly. Drape it over the top, clip or buckle it to the corners, and make sure it covers the tent fully with an air gap between fly and inner.
- Guy it out. Tension the guy-lines so the fly is drum-taut, not flapping, a taut fly sheds rain and cuts noise. On a calm dry night you can skip some guy-lines; when weather threatens, use them all.
The whole thing takes two to three minutes once you’ve practiced. That practice is non-negotiable: set the tent up in your yard or living room before the trip, so your hands know the sequence when you’re tired, cold, and losing light at a real campsite.
Safety Never cook or run a stove inside a tent or a closed vestibule. Fuel-burning stoves produce carbon monoxide, which is odorless and deadly in an enclosed space, and tent fabric ignites fast. Cook outside, in the open air. Chapter 10 has the full stove-safety rules.
Alternatives: Bivies, Tarps, and Hammocks
Beyond the standard tent lie lighter, simpler shelters, bivy sacks, tarps, and hammocks, each a legitimate choice for specific conditions and experience levels, but none the easy first shelter a beginner wants.
A bivy sack is a waterproof-breathable bag around your sleeping bag: the lightest, smallest shelter there is, great for fast-and-light solo trips, but claustrophobic and grim in sustained rain. A tarp (flat sheet pitched with cord and poles) is ultralight and versatile but offers no bug protection and demands real pitching skill. A hammock with a bug net and tarp is wonderful where trees are reliable and the ground is bad, useless above treeline or in open desert, and requires learning proper insulation underneath (your compressed back needs a pad or underquilt even in a hammock). Try these once you know what you like. Your first shelter should be the tent that just works.
Trail Notes
- The beginner’s tent: freestanding, three-season, two-person, full-coverage rainfly.
- “Season” means weather-handling, not months. Three-season covers spring–fall; four-season is winter overkill until you camp in snow.
- Double-wall design (mesh inner + waterproof fly + air gap) manages both rain and your own condensation.
- Capacity ratings are tight, size up one person for gear room. Plan with packed weight (~4–5 lb / 1.8–2.3 kg for a beginner two-person).
- A footprint protects the floor but a cheap cut sheet does it for less, and must not stick out past the tent edges.
- Practice the pitch at home; stake and guy out taut even when freestanding. Never cook inside.
Rookie Mistakes
- Buying a four-season tent “to be safe.” It’s heavier, hotter, and built for snow you’re not camping in. Three-season is the answer.
- Trusting “two-person” to mean two-plus-gear. It means two, shoulder to shoulder. Size up for comfort.
- A footprint that overhangs the tent. It funnels rain under you, precisely backward. Cut it smaller than the floor.
- First pitch in the dark, in the rain, at camp. Practice in daylight at home so your hands know the moves.
- Cooking in the tent or vestibule. Carbon monoxide and flammable fabric. Cook outside, every time.
FAQ
How do you choose a tent for backpacking? Start with a freestanding, three-season, two-person tent with a full rainfly, the forgiving all-rounder for new backpackers. From there, weigh packed weight (4–5 lb / 1.8–2.3 kg is reasonable), interior space (size up one person for gear), and price. Well-reviewed mid-priced tents outperform both bargain leakers and finicky ultralight shelters for beginners.
What’s the difference between a 3-season and 4-season tent? A three-season tent handles spring, summer, and fall, rain, wind, bugs, with good ventilation, and suits almost all backpacking. A four-season tent is built to shed snow load and survive winter storms: heavier, warmer, less ventilated. Unless you’re camping in genuine winter, three-season is the right and lighter choice.
Is a freestanding or non-freestanding tent better for beginners? Freestanding, clearly. It stands on its poles without stakes, pitches easily on any surface, and can be lifted and repositioned, forgiving of the mistakes beginners make. Non-freestanding tents save weight but need skilled staking and guy-line tension. Learn on freestanding; consider the weight savings later.
Do I need a footprint for my tent? It’s useful, not required. A footprint protects the tent floor from abrasion and punctures and adds slight water protection. But a cheap cut sheet of polycryo or Tyvek does the same for a fraction of the branded price, just cut it slightly smaller than the floor so it can’t funnel rain underneath the tent.
How much should a backpacking tent weigh? For a beginner three-season two-person tent, about 4 to 5 pounds (1.8–2.3 kg) packed is reasonable and durable. Ultralight tents drop under 3 pounds (1.4 kg) but cost far more and are often less rugged. Plan around packed weight, everything in the bag, since that’s what you actually carry, then split it among your group.
Read offline
The whole book as one PDF — every chapter, every diagram.