Chapter 12
The Small Stuff That Isn’t
Trekking poles, headlamps, and more
Between the big-ticket gear and the odds and ends lives a category of small items that shape your day out of proportion to their size and cost: poles that save your knees, a headlamp you’ll use every trip, a power strategy that keeps your navigation alive. None of it is glamorous. All of it separates a smooth trip from a fumbling one. This chapter covers the gear that earns its place by the ounce.
Do You Need Trekking Poles?
You don’t strictly need trekking poles, but most hikers who try them keep using them, they reduce load on your knees (especially descending), improve balance on uneven ground and stream crossings, and share the work with your upper body. For anyone with cranky knees or a loaded pack, they’re close to essential.
The knee argument is the strongest one. Descending with a pack drives significant force through your knees with every step, and poles measurably offload some of that, a real difference over a long downhill or a multi-day trip. Beyond knees, poles give you two extra points of contact, which turns a sketchy log crossing or a loose scree slope from nervous to routine, and they engage your arms so your legs aren’t doing all the work. The costs are minor: they occupy your hands (annoying when you want to scramble or take photos, most poles collapse and stow on your pack), and they’re one more thing to buy. Try a pair on a hilly hike; most people are quickly converted, particularly on the descents.
How to Use Trekking Poles
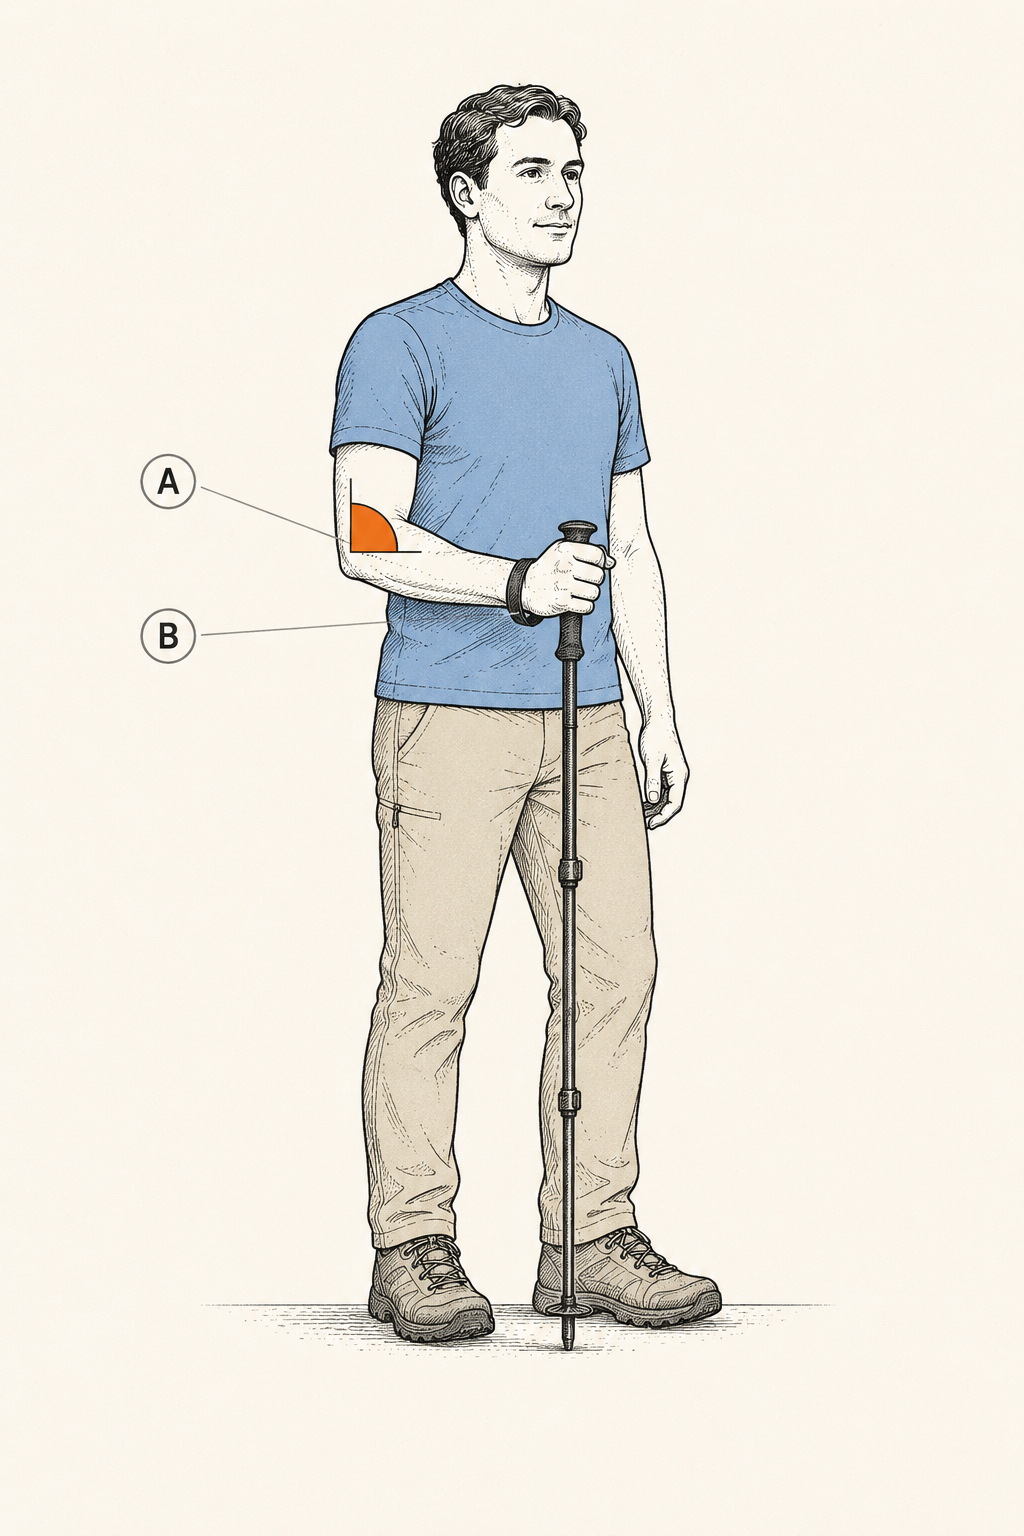
Set the pole length so your elbow bends at about 90 degrees when the tip is on the ground, then walk with a natural opposite-arm-to-leg rhythm, plant the left pole as your right foot steps forward. Adjust length for terrain: shorter for climbing, longer for descending.
The basics take one hike to learn:
- Size them. Adjust each pole so that, with the tip on the ground beside your foot, your elbow makes a right angle. Most poles are adjustable; set both equal.
- Use the straps right. Come up through the strap from below, then grip the handle over the strap. This lets the strap carry weight so your hands can stay relaxed, you push down through the strap, not by white-knuckling the grip.
- Walk naturally. Opposite arm and leg move together, just like normal walking, left pole plants with right foot. It syncs on its own within a few minutes.
- Adapt to grade. Shorten the poles a bit for climbing (keeps your hands from riding too high) and lengthen them for steep descents (reaches the ground below you for support). On traverses, shorten the uphill pole and lengthen the downhill one.
Poles double as tools: many ultralight and non-freestanding tents pitch with them, saving the weight of dedicated tent poles, a nice synergy if you go that route later.
Choosing a Headlamp
Every backpacker needs a headlamp, hands-free light for cooking, camp chores, night navigation, and emergencies. Choose one with enough brightness (200+ lumens is plenty for camp and trail), a comfortable strap, and a battery type you can manage on your trip length.
The headlamp is one of the Ten Essentials for good reason: the most common “emergency” in hiking is simply running out of daylight, and a headlamp turns that from a crisis into a minor delay. Hands-free is the whole point, you can cook, set up the tent, or read a map while it lights your work. What to look for: brightness (200–350 lumens covers everything a backpacker does; you rarely need more), a red-light mode (preserves night vision and doesn’t blind your tentmates), a comfortable, adjustable strap, and weather resistance. Weight is trivial across the category, so comfort and battery management matter more than shaving grams.
The Battery Question
Choose between rechargeable (USB) and disposable-battery headlamps based on trip length and your charging setup: rechargeable is convenient and cheap to run for weekend trips near a power bank; replaceable AAA batteries let you carry spares for long trips far from power.
This trade-off runs through all your small electronics. Rechargeable gear is economical and light on the wallet, ideal when you can top up from a power bank each night, great for weekends. Replaceable-battery gear lets you carry a few spare AAAs and never worry about charge state, which wins on long remote trips where recharging isn’t an option. Some headlamps accept both, which is the most flexible. Whatever you pick, carry spare power: extra batteries, or a power bank sized to your trip. Cold weather drains batteries faster, so pad your estimate in the cold and keep spares warm.
Managing Your Electronics
Bring a power bank sized to your trip to keep your phone (navigation, camera, emergency communication) and headlamp alive, and manage your phone’s battery aggressively with airplane mode and offline maps. Your phone is a critical tool only as long as it has charge.
Phones have become central backcountry gear, navigation, camera, trip logs, emergency communication, which makes battery management a real skill. Airplane mode is the single biggest saver: a phone hunting for signal in the backcountry drains fast, so switch to airplane mode and turn location services on only when you need a GPS fix. Download your maps for offline use before you leave (Chapter 16). Keep the phone warm in cold weather (batteries plummet in the cold; sleep with it). And size a power bank to your trip: a small 10,000 mAh bank recharges a phone two to three times, enough for a weekend; longer trips need a bigger bank or a disciplined power diet. For serious remote travel, a small solar panel or a large-capacity bank keeps everything running.
Knife, Repair Kit, and Small Tools
Carry a small knife or multitool and a compact repair kit, a few feet of duct tape, a couple of zip ties, gear-specific repair items (tent pole splint, pad patch), and cord. These weigh ounces and turn trip-ending gear failures into minor field repairs.
A small knife or multitool handles food prep, gear repair, first aid, and a hundred small tasks; you don’t need a large blade, a modest folding knife or a light multitool is plenty. The repair kit is where experience shows: a strip of duct tape wrapped around a pole or bottle (no need to carry the whole roll), a few zip ties, a needle and strong thread, a pole-repair sleeve, your sleeping-pad patch kit, and a length of cord (a few meters of thin, strong line has endless uses, repairs, guy-lines, a clothesline, a bear-hang if needed). Match the repair kit to your actual gear: know how to splint a broken tent pole, patch your specific pad, and fix a pack buckle. These small items are the difference between limping out early and finishing the trip.
Signaling and the Rest of the Kit
Round out the small gear with a whistle (three blasts is the universal distress signal, and it carries far past your voice), sun and bug protection appropriate to the season, and the personal items, sunglasses, lip balm, small toiletry kit, that a comfortable hiker carries.
A whistle weighs almost nothing and could save your life, three sharp blasts, repeated, is the recognized signal for help, and it’s audible far beyond a shout when you’re injured or lost (many pack sternum straps have one built in). Add sun protection (sunscreen, lip balm, sunglasses, see Chapter 2) and insect protection (repellent, and a head net in buggy season, Chapter 23), scaled to conditions. The personal miscellany, a small trowel and toilet kit (Chapter 20), any medications, a bit of cash and ID, rounds out a kit that handles the ordinary day and the occasional bad one. None of it is heavy. All of it is what “prepared” actually looks like: a collection of small answers to small problems, carried before you need them.
Trail Notes
- Trekking poles aren’t mandatory but save knees (especially descending), aid balance, and share the load. Most who try them keep them.
- Size poles to a 90° elbow bend; use the straps from below; walk opposite-arm-to-leg; shorten for climbs, lengthen for descents.
- A headlamp is essential, 200–350 lumens, red mode, comfortable strap. The most common “emergency” is just darkness.
- Match battery type to trip: rechargeable for weekends near power, replaceable AAAs for long remote trips. Always carry spare power.
- Manage the phone: airplane mode, offline maps, keep it warm, size a power bank to the trip.
- Small kit, big payoff: knife/multitool, repair items (duct tape, zip ties, pad patch, pole splint, cord), whistle, sun and bug protection.
Rookie Mistakes
- Gripping poles by white-knuckling the handle. Come up through the strap and let it carry weight; your hands should stay loose.
- One headlamp, dead batteries, no spares. The light you didn’t power is the crisis the essentials were meant to prevent.
- Leaving the phone off airplane mode. Signal-hunting drains it fast; you’ll reach camp with 8% and no map.
- No repair kit. A snapped pole or torn pad ends a trip, unless you carry the few ounces that fix it.
- Skipping the whistle because your voice seems fine. Injured and hoarse at dusk is exactly when three blasts do what a shout can’t.
FAQ
How do you use trekking poles for beginners? Set each pole so your elbow bends at a right angle with the tip on the ground, thread your hand up through the wrist strap from below so it carries the load, then walk naturally with opposite arm and leg, left pole plants with right foot. Shorten the poles for climbing and lengthen them for descents. It clicks within one hike.
Do I really need trekking poles? Not strictly, but they help most hikers, especially on descents, where they offload real force from your knees, and on uneven or slippery terrain, where two extra contact points improve balance. If you have knee issues or carry a loaded pack, they’re close to essential. Borrow or rent a pair and try them on a hilly hike before buying.
How many lumens do I need in a hiking headlamp? About 200 to 350 lumens covers everything a backpacker does, camp chores, cooking, and night hiking on a trail. Higher outputs exist but drain batteries fast and are rarely needed. Prioritize a red-light mode (preserves night vision), a comfortable strap, and a battery setup you can sustain for your trip length.
Should I get a rechargeable or battery-powered headlamp? Rechargeable (USB) headlamps are convenient and cheap to run, ideal for weekend trips where you can top up from a power bank. Replaceable-battery (AAA) headlamps let you carry spares and never worry about charge state, which wins on long remote trips. Some accept both. Either way, always carry backup power.
How do I keep my phone charged on a backpacking trip? Put it in airplane mode (signal-hunting is the biggest drain), use downloaded offline maps, and keep it warm in cold weather. Carry a power bank sized to your trip, a 10,000 mAh bank recharges a phone two to three times, enough for a weekend. Longer trips need a larger bank or a strict power diet.
Read offline
The whole book as one PDF — every chapter, every diagram.