Chapter 15
Everything in Its Place
How to pack a backpack
You’ve chosen your gear; now you have to make it all fit, ride well, and be findable in the dark. How you pack a backpack changes how it feels on your body more than most people believe, the same load, packed two different ways, can carry like two different weights. This chapter covers the loading zones that put weight where your body wants it, the organizing habits that keep chaos out, and the honest reckoning with total weight that makes everything lighter.
How to Pack a Backpack: The Zones
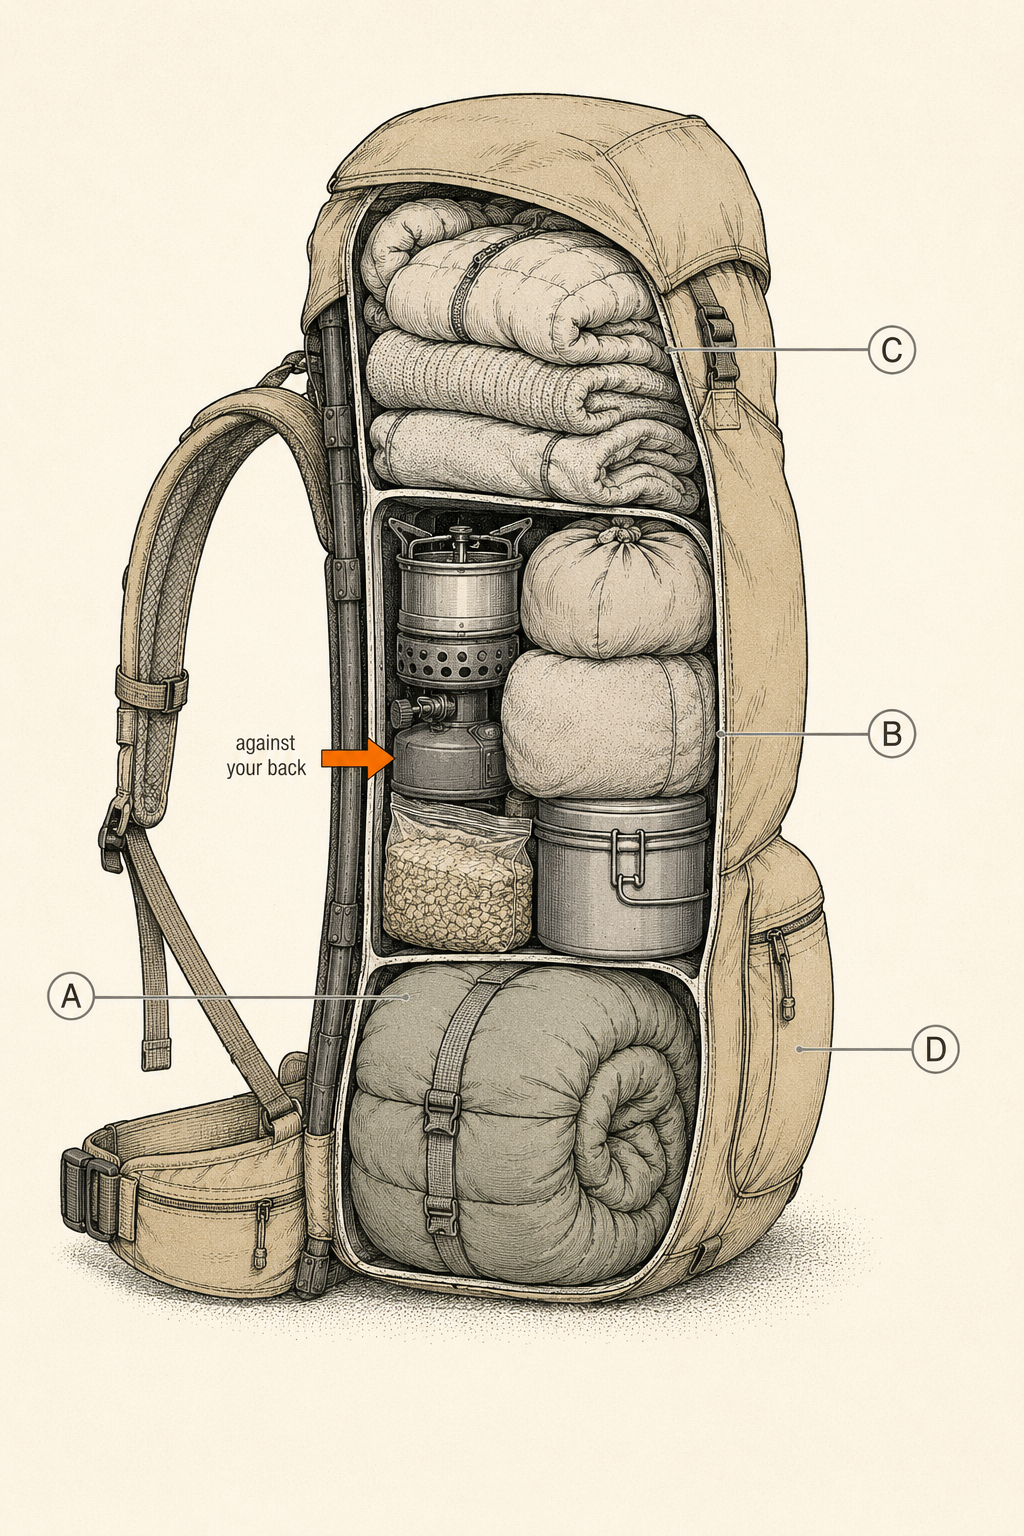
Pack in three horizontal zones, bottom to top: light, bulky sleep gear at the bottom; heavy items in the core, centered and close to your back; medium day-use items on top. This keeps the load’s weight centered over your hips and close to your spine, where your body carries it most efficiently.
The physics is about your center of gravity. Weight held high and far from your back levers you backward and makes the pack feel heavier and less stable; weight centered and close to your spine sits over your hips and lets you walk upright and balanced. So:
- Bottom zone: light, bulky, sleep-only gear, your sleeping bag, and often your sleeping clothes. You won’t need these until camp, and they cushion the base.
- Core zone (middle, against your back): the heavy stuff, food bag, water reservoir, stove and fuel, cookware. Kept low-to-mid and hard against your spine, this dense weight rides right over your hips.
- Top and outer zones: medium-weight items you may want during the day, rain shell, first aid, water filter, snacks, plus anything you need quick access to.
This is the single most useful packing concept, and it’s why two packs of identical weight can feel so different: the one with the heavy items centered and close simply carries better.
Organizing With Stuff Sacks
Group your gear into a few labeled stuff sacks by category, sleep, kitchen, clothing, food, so everything has a home and you can find any item fast. Consistent organization is what turns packing from a nightly puzzle into a two-minute routine.
Loose gear in a pack is chaos: you dig for the headlamp and unpack half your kit to find it. Stuff sacks solve this by grouping related items into findable bundles. A workable system: a sleep sack (bag, sleeping clothes), a kitchen sack (stove, fuel, pot, utensils, food-cleanup items), a clothing sack (spare layers), and a food bag (all your food and anything scented, kept together for bear-safe storage, Chapter 23). Use different colors or label them so you know each by sight. Keep the things you want during the day, snacks, map, sunscreen, rain shell, first aid, water filter, in outer pockets or the top, not buried. The payoff compounds: everything has a permanent address, you pack and unpack the same way every time, and you never again unpack the whole bag to find one item. It also makes bear-bagging or canister-loading trivial, since your smellables are already together.
Waterproofing the Contents
Because packs aren’t waterproof (Chapter 6), line the inside with a waterproof liner, a dedicated pack liner or a sturdy trash bag, and keep your critical dry items (sleeping bag, insulation, spare clothes) inside it. Rain covers help but liners are more reliable.
A wet sleeping bag can turn a cold night dangerous, so protecting your dry gear is a safety measure, not just a comfort one. The most reliable method is a liner inside the pack: put a large waterproof bag (a purpose-made liner, or a heavy-duty trash compactor bag) inside the pack body and pack your gear within it, then roll the top closed. This keeps water out even if the pack is soaked, submerged in a stream crossing, or set down in mud. A rain cover over the outside helps too, but water can still sneak in at the back panel and seams, so many experienced hikers use a liner as the primary defense and treat a rain cover as a bonus. Keep the sleeping bag and insulation double-protected in their own stuff sacks inside the liner, those are the items you cannot afford to get wet.
What Is Base Weight?
Base weight is the weight of your pack and everything in it except consumables, food, water, and fuel. It’s the number backpackers use to compare and lighten their kit, because it’s the part that stays constant, and getting it down is the key to a comfortable pack.
The distinction matters because food, water, and fuel change constantly (you eat, drink, and burn them) while your gear’s weight is fixed. Base weight isolates the part you can optimize by gear choices. Rough benchmarks: a traditional base weight runs above 20 pounds (9 kg); lightweight is roughly 10–20 pounds (4.5–9 kg); ultralight is under 10 pounds (4.5 kg). Beginners often start traditional and lighten over time, that’s normal and fine. Add consumables on top: food at roughly 1.5–2 pounds (0.7–0.9 kg) per person per day, water at 2.2 pounds per liter (1 kg), and fuel. Total it up, compare to the 20-percent-of-body-weight target from Chapter 6, and you’ll see immediately where you stand.
Cutting Weight (Without Buying Anything)
The biggest weight savings come from the “big three” (pack, shelter, sleep system) and from leaving things home, not from expensive gadgets. Before spending money to go lighter, weigh everything, question every item, and cut the just-in-case gear.
Lightening your pack is mostly free. The method:
- Weigh everything. A kitchen scale and a list. You can’t cut what you haven’t measured, and the results surprise everyone, the weight hides in items you never suspected.
- Question every item. For each thing, ask: have I used this on recent trips? Does something else already do this job? Am I carrying a fear rather than a need? The multi-tool, the third jacket, the “just in case” gear, this is where pounds hide.
- Attack the big three first. Your pack, shelter, and sleep system are the heaviest items, so a lighter choice there saves more than trimming ounces off small stuff. (This is why they got so much attention in Part II.)
- Don’t carry duplicates or excess. One pot, not two. The right amount of food, not a surplus. Repackage food out of heavy boxes and cans into bags. Decant toiletries into tiny containers.
- Share group gear. On a group trip, split the tent, stove, and cookware among packs instead of everyone carrying their own.
The order matters: exhaust the free savings (leaving things home, sharing gear, repackaging) before you spend a dollar on lighter equipment. Most beginners can cut several pounds without buying anything, just by being honest about what they actually use.
How to Lift and Put On a Loaded Pack
Lift a heavy pack in stages to protect your back: hoist it onto a raised surface or your bent knee first, get an arm through one shoulder strap, swing it onto your back, then thread the other arm and buckle up hips-first. Never swing a heavy pack up in one jerking motion.
A loaded pack is heavy and awkward, and heaving it up carelessly is a great way to tweak your back before you’ve taken a step. The staged method:
- Use a helper or a raised surface if you can. A friend holding the pack, or resting it on a rock, log, or your car’s bumper, makes putting it on effortless.
- Solo, use the knee-hoist. Loosen the straps. Grab the haul loop and a shoulder strap, lift the pack onto your bent thigh so it rests on your leg.
- One arm in. From the thigh, slip your arm through the shoulder strap on that side and swing the pack around onto your back.
- Other arm and settle. Thread the second arm through, lean forward slightly to settle the pack, then stand up straight.
- Buckle hips-first. Fasten and snug the hip belt first (get the weight onto your hips), then the sternum strap, then fine-tune (Chapter 6’s adjustment sequence).
Reverse it to take the pack off, don’t just drop it (that’s hard on the pack and on your back). A little technique here saves your back over a multi-day trip.
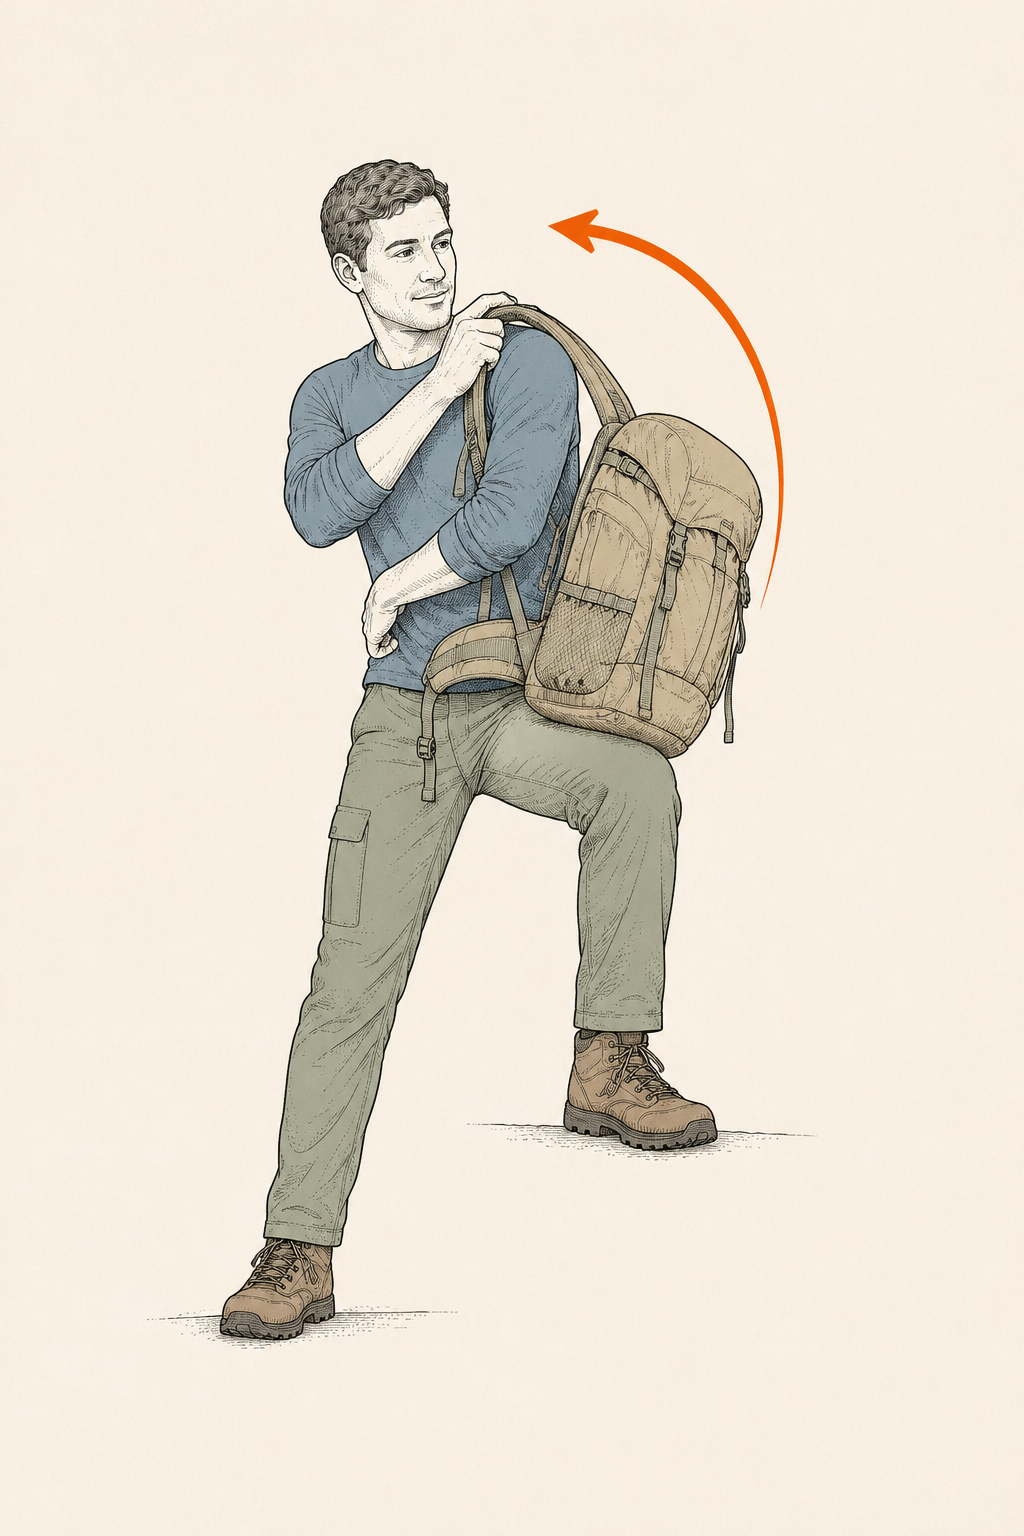
(This is step two of a three-part lifting sequence; the full sequence, thigh hoist, arm-through-and-swing, settle-and-buckle, is best learned by doing it a few times at home with a loaded pack.)
Final Pre-Trip Pack Check
Before every trip, do a full pack-out at home: lay out everything against your checklist, pack it in your zones and sacks, weigh the loaded pack, and do a final walk-through so nothing essential is left on the floor.
The night-before pack-out (never the trailhead) is where trips are saved. Lay every item out against your checklist (Appendix A), confirm nothing’s missing and nothing extra crept in, then pack it properly, zones, stuff sacks, dry liner, day items accessible. Weigh the finished pack and sanity-check it against your body-weight target; if it’s too heavy, now is when you fix it, not at the trailhead. Then do a final scan of your checklist and your floor. The most common way to forget the fuel, the spoon, or the tent poles is to pack in a hurry the morning of. Pack calm, pack the night before, and leave the house knowing exactly what’s on your back.
Trail Notes
- Pack in zones: light/bulky sleep gear at the bottom, heavy items centered against your back, medium day-items on top, quick-grab items in outer pockets.
- Weight centered and close to your spine carries lightest, same load, better ride.
- Organize with a few labeled stuff sacks (sleep, kitchen, clothing, food); keep day items accessible; keep smellables together for bear storage.
- Line the pack with a waterproof bag; double-protect the sleeping bag and insulation. Packs aren’t waterproof.
- Base weight = gear minus food/water/fuel. Lighten it mostly for free: weigh everything, cut just-in-case items, attack the big three, share group gear.
- Lift a loaded pack in stages (knee-hoist, arm-through, swing, buckle hips-first). Never jerk it up.
Rookie Mistakes
- Heavy items low and far from the back. It levers you backward and makes the load feel heavier. Center the weight against your spine.
- Everything loose in one compartment. You’ll unpack the whole bag to find the headlamp. Stuff sacks give everything an address.
- Trusting the pack to be waterproof. It isn’t. Line it, or meet your soaked sleeping bag at camp.
- Buying lighter gear before cutting free weight. Weigh everything and leave the just-in-case items home first, pounds are free there.
- Heaving the loaded pack up in one motion. That’s how backs get tweaked at the trailhead. Use the staged knee-hoist.
FAQ
How do you pack a backpacking backpack? In vertical zones: light bulky sleep gear at the bottom, heavy items (food, water, stove) centered against your back over your hips, medium day-use items on top, and quick-grab items in outer pockets. Organize gear into labeled stuff sacks, line the pack against rain, and keep what you need during the day accessible. Centered, close-to-the-spine weight carries lightest.
Where should the heaviest items go in a backpack? In the middle of the pack, close to your back, roughly between your shoulder blades and hips, hard against the back panel. This keeps the dense weight centered over your hips and near your spine, so it doesn’t lever you backward or throw off your balance. Heavy items high and far from your back make the same load feel heavier and less stable.
What is base weight in backpacking? Base weight is the weight of your pack and gear excluding consumables, food, water, and fuel. It’s the fixed part of your load, so backpackers use it to compare and lighten kits. Roughly: over 20 lb (9 kg) is traditional, 10–20 lb (4.5–9 kg) is lightweight, and under 10 lb (4.5 kg) is ultralight. Add food, water, and fuel for total pack weight.
How can I make my backpack lighter? Mostly for free: weigh every item, then cut the just-in-case gear you don’t actually use, share group gear, and repackage food out of heavy boxes. Focus biggest savings on the “big three” (pack, shelter, sleep system). Exhaust these free and cheap savings before spending money on lighter equipment, most beginners shed several pounds just by being honest about what they carry.
How do you put on a heavy backpack? In stages: loosen the straps, hoist the pack onto your bent knee, thread one arm through a shoulder strap, swing it onto your back, thread the other arm, then buckle and snug the hip belt first, sternum strap second. Use a friend or a raised surface when you can. Never jerk a loaded pack up in one motion, that’s how backs get injured.
Read offline
The whole book as one PDF — every chapter, every diagram.